Tag Archives: vegetable gardening

Leek and Potato Soup

  leek soup3 pounds medium potatoes

3 leeks or about 6 cups chopped

6 Tablespoons butter

6 to 8 cups water or chicken broth

1 cup half and half or evaporated milk

Salt and pepper to taste

Garnish:  Bacon bits and/or sour cream and chives 

1. Peel and cube potatoes.  Wash, trim, and chop the leeks, using as much of the green tops as is fresh.

2. In large stock pot, melt butter and add leeks, lightly cooking on medium heat until wilted.

3. Add potatoes and broth.  Bring to boil, reduce heat and simmer until potatoes are tender, about 40 to 45 minutes.  If a thicker soup is desired, drain some of the liquid at this time.   Add half and half or evaporated milk and heat before serving.  Taste for salt and pepper.   Garnish, as desired. 

Serves 14 – 16 

Linda

Recipe is adapted from The Peach Tree Tea Room Cookbook

Growing Leeks In Your Dallas Garden

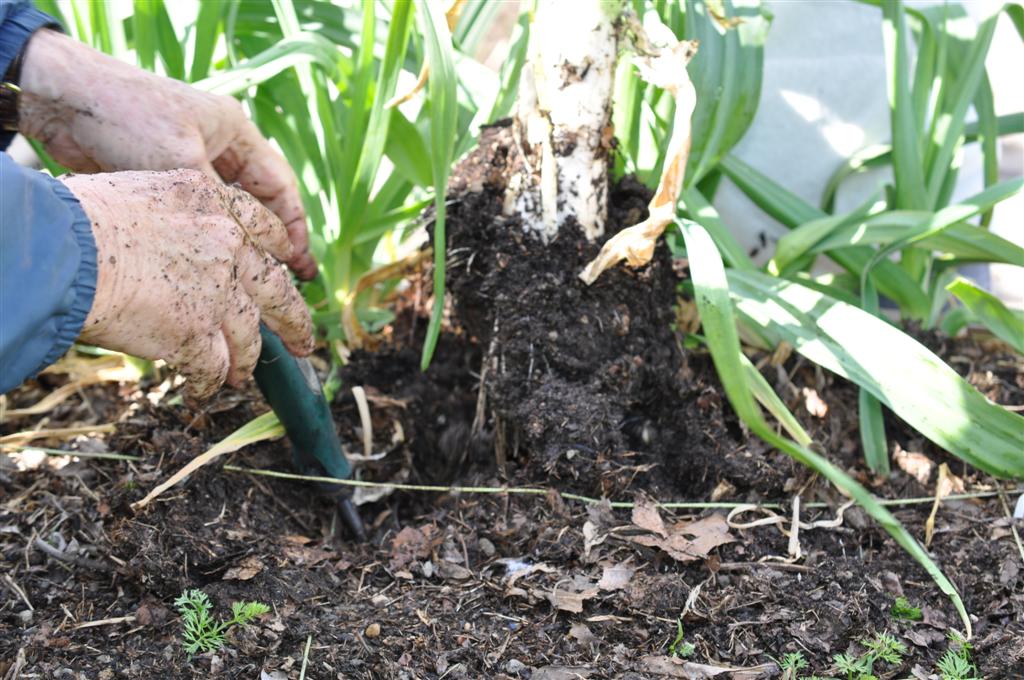
Jim wasn’t exactly sure what had been given to him when he dropped that pencil thin “slip” into the ground over 6 months ago.  This week our garden gave us the answer. Buried deep in the soil and somewhat stubborn about wanting to come out, we were finally able to get beneath the dense roots and give a hefty yank.  The game of tug-of-war had ended and our leek surrendered to an early spring harvest. 

Harvesting Leeks At The Demonstration Garden on Joe Field Road

Leeks are related to garlic and onions but have a much subtler, sweeter and more sophisticated flavor.  They can be used to enrich soups or stews and   partner well with potato and cheese to form tasty side-dishes and suppers that comfort and satisfy throughout the fall and winter. 

Leeks Harvested

History 

Leeks have been cultivated for thousands of years and are depicted in surviving tomb paintings from the time of the Ancient Egyptians.  The Romans considered the leek a superior vegetable with Emperor Nero thinking that eating leeks would improve his singing voice. 

Biology 

The leek is a member of the onion family.  It thrives in cooler climates and is tolerant of frost, hence its great popularity as a winter vegetable. 

Nutrition 

Leeks are an excellent source of vitamin C as well as iron and fiber.  They provide many of the health-giving benefits associated with garlic and onion, such as promoting the functioning of the blood and the heart. 

Preparing

Remove any damaged outer leaves.  Trim the rootlets at the base and cut off around a half to two thirds of the dark green tops.  Partially cut the leaks in half lengthwise, starting at the middle and running the knife up to the green tops.  Make a second lengthwise cut perpendicular to the first, allowing you to fan out the leaves.   Give them a good rinse to remove the dirt that can get trapped inside as the leek grows.  Enjoy these simple recipes coming your way in the next few days!

Linda

Soups And Cornbread With Veggies

Broccoli Cornbread

Broccoli Veggie Cornbread 

½ stick butter or margarine, melted

2 eggs, slightly beaten

1 pkg Jiffy Cornbread Mix

½ pkg (10 oz) frozen chopped broccoli, cooked (about 1 cup)

½ cup small curd cottage cheese

½ cup canned creamed corn

Grated onion or chopped green onion, if desired 

Preheat oven to 350 degrees. Chop cooked broccoli a bit smaller. In a large bowl melt butter in microwave. Add chopped broccoli, cottage cheese, corn, onion and beaten eggs. Mix till combined. Stir in cornbread mix.

Pour into greased 8 x 8 Pyrex for thicker squares or 7 x 11 Pyrex for less thick squares. Bake about 35 minutes or until toothpick in center comes out clean. 

Patti,Dallas County Master Gardener Class 2012

 Spicy Refried Bean Soup

1 can (15oz) fat-free, spicy refried beans

1 can (15 oz) whole kernel corn, drained

1 can (15 oz) black beans, rinsed and drained

1 can (14.5 oz) vegetable broth

2 cans (10oz) Rotel tomatoes with green chilies

1 cup water

Mix all ingredients in a large pan.  Heat on medium until it comes to a boil.

 Reduce heat and simmer 8-10 minutes.  Serve with tortilla chips.

Makes 2 quarts.  Less than 120 calories per 8oz. serving.

“Heat” can be adjusted by using less Rotel tomatoes

Sarah, 2006

Mediterranean Lentil Ragoût

Olive oil cooking spray

1 large onion, finely chopped

5 cloves garlic finely minced

1 jalapeño pepper, finely minced

1 large fennel bulb, sliced thin

1 (28 ounce) can diced tomatoes

1 1/2 cups orange juice

1 1/3 cups lentils, picked over and rinsed

1 Tablespoon dried basil

1 Tablespoon dried oregano

1/4 cup tomato paste

1/3 cup mint leaves, chopped, divided use

6 cups cooked rice, quinoa or bulgur

Parmesan cheese (optional)

1. spray a heavy skillet with cooking spray; place over low heat and sauté onion, garlic, jalapeño and fennel, stirring occasionally, until soft, about 5 minutes. (if vegetables start to stick or brown, cover skillet.)

2. Add tomatoes, orange juice, lentils, basil, oregano and tomato paste. Increase heat and bring to a boil.  Reduce heat, cover and simmer for 40 to 50 minutes, or until lentils are tender. (add up to 1/2 cup water or orange juice if ragout gets too thick.)

3. Stir in mint leaves, reserving 2 tablespoons for garnish.  Serve lentil stew over rice, quinoa or bulgur. Garnish with Parmesan cheese, if using, and remaining chopped mint.

Serves 6, approximately 449 calories per serving

Recipe from The Phytopia Cookbook by Barbara Gollman and Kim Pierce
 

Homegrown, Veggies, Fruits and Herbs

I have a visual image of Master Gardener and nutritionist Barbara Gollman at Kroger: Red hair flying, trim figure running behind a cart, zipping down the frozen food isle flinging packs of frozen veggies into the cart for one of her wonderful soups. 

Barbara, Dallas County Master Gardener Teaches Value of Vegetables

Barbara intrigued a large group of Master Gardeners Tuesday with her talk on the nutritional benefit of vegetables, fruits, and herbs.  Turns out that Mom was correct when she urged us to eat our vegetables.  Carrots, oranges, sweet potatoes, and other fruits and vegetables are full of phytochemicals, substances in plants that have the potential to slow aging, boost immunity, prevent disease, and strengthen our hearts and circulation. 

Cabbage, Broccoli Field Road, Dallas, Texas

Barbara suggests that we eat watermelon and tomatoes, plants that are packed with lycopene, a nutrient which helps prevent macular degeneration.  Pinto beans are rich in fiber, which can prevent cancer and heart disease, and flavonoids, which can curb the oxidation of LDL cholesterol and prevent blood clotting.  Cruciferous vegetables like broccoli and cabbage are high in calcium.  Nuts are filled with Vitamin E, one of the most potent fat-soluble antioxidants. Berries, greens, winter squash—-well, you get the idea.  

Barbara said that new research has shown the health benefits of herbs. Who knew? Turns out that 1 teaspoon of oregano = ¾ cup of brussel sprouts in antioxidants.  

Barbara dries her herbs in the microwave after her husband’s reaction to using his closet as an herb drying rack. Remove the leaves from the stems of the herbs and spread on paper towels.  Put two paper towels on top of the herbs.  Pop in the microwave and zap for one minute.  (If the leaves are charred, try again and use a shorter amount of time. If the leaves aren’t crisp, microwave longer in 15-second increments.)  Remove from the microwave and air dry on the kitchen counter for a few days.  Store in a labeled glass jar.  

Are home grown vegetables better for you than those found in the grocery? Barbara says some research showed up to a 15 percent increase in nutrients in homegrown and organic vegetables.  Some other studies didn’t find an increase in nutrients. 

Many thanks go to Barbara for her research and common sense approach to healthy eating.  Let’s just put it this way: on the way home I stopped at Whole Foods and bought spinach, broccoli, and almonds for dinner.   

Elizabeth

Recipes served in the class will follow.

One Potato, Two Potato, Hopefully More

One of the joys of winter is to sit down with a cup of tea or hot chocolate and thumb through garden books and catalogues.   Visions of a riot of color from  gorgeous flowers (does it really matter that my yard is shaded by many tall trees and the descriptions say “full sun”) and bountiful vegetable harvests (surely there is a shade tolerant tomato) always seem to intoxicate me into ordering or purchasing many more seeds and products than any reasonable person needs or can use.  Of course, most of the sunny place flowers struggle, get lanky, then die a slow death in the shade of my yard; and, so far, I haven’t discovered a shade tolerant productive tomato.  Yet spring holds such promise, and occasionally I find a particular variety of full sun plant that tolerates shade, that I forget the failures of last year and try again.  After all, some experiments turn out well.

     For the past two years the Garden’s vegetable guru, Jim,  has experimented with the “trash can” method of planting potatoes.  If you are not familiar with this method there are several  YouTube videos showing literally pounds and pounds of potatoes being harvested from potato sets planted in 30 gallon trash cans.  To construct a “trash can” potato bin, a drainage hole is made in the bottom of a plastic trash can, Seed potatoes are planted at the bottom of the can in a few inches of soil, then as the potato plants grow to about eight inches tall enough soil (in the Garden’s case, the Garden’s homemade compost) is added to cover them half way up the stem.  At the end of the season, the trash can is dumped and the potatoes are harvested.  An easy way to grow potatoes?  It certainly sounds like it.  However Jim reported that in the first year’s experiment, the Garden’s trash can potatoes rotted.  Guessing that perhaps there wasn’t enough drainage, the second year Jim tried putting 2” drainage holes around the side of the can.  Once again, though the plants themselves were huge and vigorous since they were growing in all that compost, the actual potato yield was small and many of the potatoes continued to rot. 

     A failed experiment, perhaps….  however one always learns something.  Jim surmised that perhaps the problem was that the potato plants were not getting enough sun.  Potatoes need full sun and the opaque trash can shaded them unless the sun was directly overhead.    It wasn’t until months later when the plants grew over the top of the can that they were in full sun throughout the day.

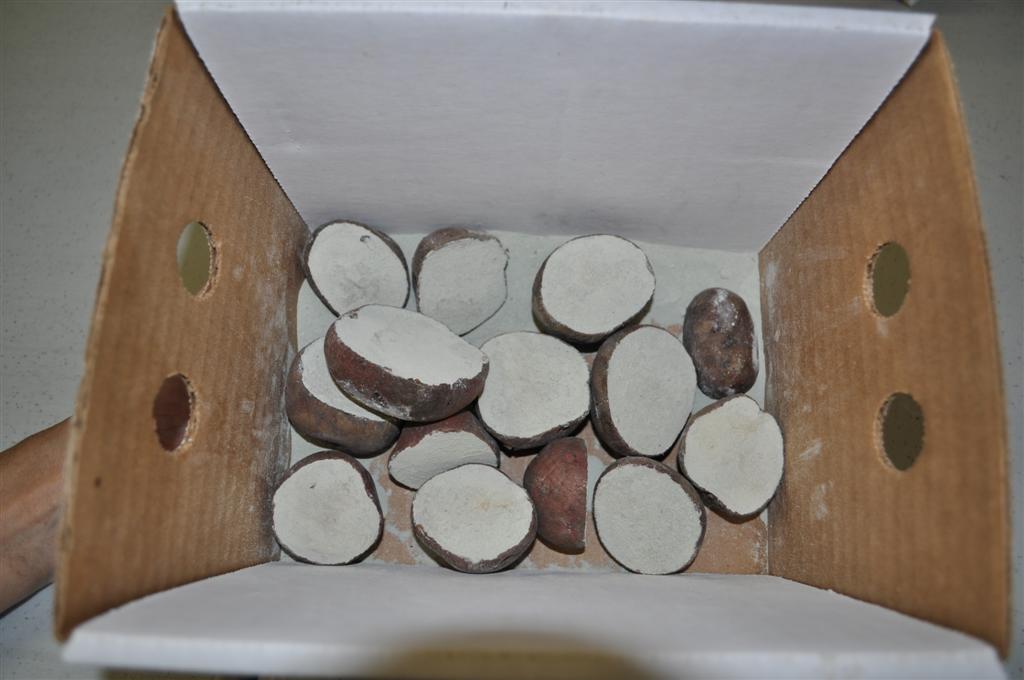
     So, this year, the Garden is trying two methods to grow potatoes.  The first, in the garden’s raised bed, is the usual “trench method” where a trough about 6”-8” deep and about 4” wide is dug.  Seed potatoes that have been cured and dusted with sulfur are planted about 12”-15” apart and covered with about 4” of soil.  As the potatoes sprout, the soil is “hilled”/backfilled around the stems since potatoes grow in the space between the seed potato and the surface of the soil.    

Red La Soda Potatoes, Dusted With Sulfur, Ready For Planting

                                                               . 

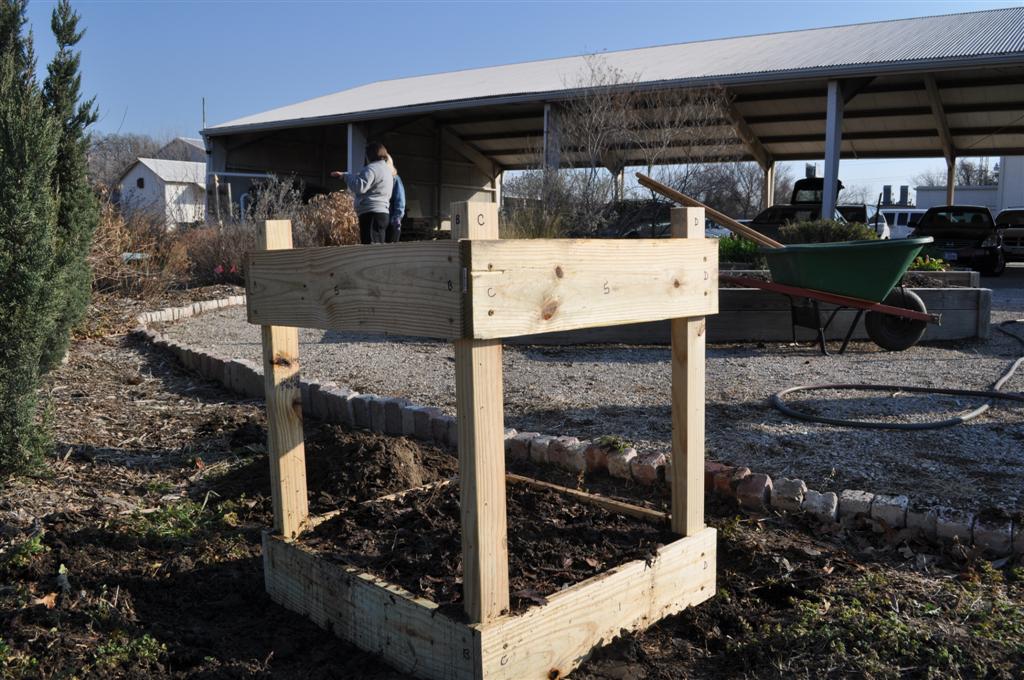
    The second experimental method being tried is Jim’s homemade 2’x2’ potato bin constructed from 1”x6” treated lumber (one can also use untreated lumber or cedar).  As the potatoes plants grow to about 12” tall, another 6” panel of lumber will be added to the bin and enough soil added to bury 1/3 of the plant. 

New Potato Bin At The Demonstration Garden

The advantage to this type of bin as opposed to the trash can method will not only be increased drainage but also the potato plants will be able to receive full sun throughout the day since more panels can be added as the potato vines grow taller.  Will this method produce a better crop of mature potatoes?  Who knows….. but that’s the fun of experimenting.

     There are many other methods (potato bags/wire bins lined with newspaper/etc) used to plant potatoes.   Do you have a favorite method for planting potatoes?   If so, let us know.  This year in my community garden plot, I plan to try “laundry basket” potatoes:  cutting out the bottom of a plastic laundry basket and using it like a cage to hold the mounded soil around my potatoes.  If it works, I’ll let you know the results.  If not, I’ve only lost several small seed potatoes plus three dollars to purchase three laundry baskets from the Dollar Store.  So tell us your method— and Happy Experimenting!!

Carolyn

Arugula-Pear-Blue Cheese Salad

Arugula, Pears, Pecans, Blue Cheese For Salad

1/4 cup plus 2 Tbsp peach or pear preserves

1/2 cup Champagne vinegar

1 shallot, sliced

2 tsp. Dijon mustard

1/2 tsp salt

1/4 tsp freshly ground pepper 

1/2 cup olive oil 

8 cups loosely packed arugula

2 Bartlett pears, cut into 6 wedges each

4 oz. blue cheese, crumbled

1/4 cup chopped toasted walnuts or pecans 

Process 1/4 cup preserves and next 5 ingredients in a food processor 30 seconds to 1 minute or until smooth.  With processor running, pour oil through food chute in a slow steady stream, processing until smooth.  Transfer to a 2-cup measuring cup or small bowl, and stir in remaining 2 Tbsp peach preserves. 

Place arugula in a large serving bowl.  Top with pears, blue cheese, and pecans.  Drizzle with vinaigrette. 

Elizabeth  From Southern Living Magazine 

Vegetable Planting in January

1015Y  Texas SuperSweet Onions planted January 8, At The Demonstration Garden

Brrr…it has been cold in Dallas, Texas since our snowy Christmas day.  My thoughts have not been about digging  in the garden.  Sitting by the fireplace with a hot cup of tea and garden catalogs spread at my feet seem right for January.

The gardening calendar has other thoughts.   Potatoes and onions are ready to be planted now!  Jim and Hans  planted our onion sets last week.  Jim likes to get an early start on onions and plants them just as soon as he can find them in Dallas garden centers. 

 To grow fist size onions, you need to select the right variety, plant between January 1st and February 15th, and maintain optimum moisture and fertility. We like the  famous 1015Y  Texas SuperSweet.  Other recommendations from Texas A&M include :  Bermuda, Southern Belle, White Granex, Yellow Granex and Burgundy.

Plant your onion sets about 4 inches apart in raised furrows.  Keep them moist not wet.  At the Demonstration Garden we  add  compost to provide the nutrients onions crave. 

And what’s the payoff for getting outside in January  to plant onions?   Remember the sweet and savory onion tarts we made last May! 

Ann

Next week we will be plant potatoes, and seeds of beets, lettuce, carrots, and radishes.

Lakota Squash, An Heirloom Vegetable For Fall Gardens

Lakota Squash Planted In  Early August

Lakota squash is one of the winter storage types of squash. It’s a medium sized,  pear-shaped squash, weighing an average of about seven pounds. The outer shell is hard with interior flesh a golden yellow. The flavor is nutty and sweet. The Lakota squash derives its name from the Lakota Tribe of the Sioux Indians who prized this hardy winter squash for cooking and baking.   We like to think we are continuing their history by growing it at The Demonstration Garden. 

Store Lakota squash in a cool, dry place for up to three months or more after picking them. Since this is our first time to grow this heirloom vegetable, we may try one of these cooking ideas from Chef Kyle Shadix :

• Purée in food processor with light coconut milk, curry, and freshly minced and sautéed ginger and garlic.
• Add brown sugar, vanilla extract, and toasted walnuts.
• Add maple syrup and toasted almonds.
• Serve mashed with salt and pepper and a touch of real butter.
• Mix with prepared pesto and sprinkle with Parmesan or Pecorino Romano cheese.

Because Lakota Squash is an heirloom variety not a hybrid, the seeds will produce offspring like the parent. Next year we can share the seed and all get a little taste of Sioux history!

Ann

Beets And Turnips From A Dallas Garden

When my husband called tonight and asked “what’s for dinner”, I said “beets”. Silence ensued. What he didn’t know was that a stampede almost took place in the garden today when we were harvesting our turnips and beets.  Our Dallas County Master Gardeners know eating your vegetables is not only good for you, it is downright tasty. 

Beets And Turnips Harvested At The Demonstration Garden

Turnips can be mashed like potatoes or used in gratins, couscous, or  frittatas.

Tokyo Cross Hybrid Turnips Grown At The Demonstration Garden

Tired of pickled beets?  Try a beet cocktail for something different.  Eat the tops of both of these vegetables for an extra nutrition boost.

Burpee Golden Beets

 Aside from the enthusiasm over our harvest, the most astonishing thing was that just six weeks ago we were planting these crops by seed.  We planted Purple Topped and White Tokyo HyBrid Turnips, Detroit Dark Red Beets and Burpee’s Golden.  We are hoping for a repeat performance when it is time to plant beets and turnips again February 1.

All the talk was of dinner when we left the garden today and I knew each pot would hold some of our harvest.  We had Beets and Beet Greens with Maple Walnuts. Now he’s talking!

Ann

Bushels Of Butternuts

Even the name—butternut—brings fall to mind.  Nature brings us such end of the season treats in November.  The queen of winter squash hides hers in a soft beige overcoat, revealing the rich, orange-yellow flesh when cut.

Butternut Squash Growing In Our Garden With Unfortunate Mildew On Leaves

Jim, our vegetable expert at the garden, has harvested bushels of lovely butternuts.  He planted the exuberant vines in the heat of the summer, with harvest plans for November. All squash are types of gourds.  Butternuts should be harvested when firm, well shaped, and heavy for their size.  Unlike their thin-skinned summer cousins, winter squash have a hard tough shell.  Butternuts can be stored for several months in a cool, dark place. 

Of course, the fun is deciding how to serve butternuts.  Soup? Such a lovely, rich addition to the Thanksgiving table.  Roasted? Add a bit of fresh ginger and butter. Or enjoy its sweet, slightly nutty flavor in filled pastas, spicy curries, or stews. 

Butternut–and other winter squash like acorn, pumpkin, and Hubbard–are a nutritional bonanza. They are rich in Vitamin A (beta-carotene), fiber, folate (folic acid) and potassium.

Butternut Squash Harvested From Our Garden Atop A Store Bought Pumkin

So don’t pass up these lovely winter squash for your Thanksgiving table.   You might try my daughter Molly’s favorite: Butternut Squash Soup.

Butternut Squash Soup 

1 Tbs olive oil

5 oz. pancetta, cut into small dice

1 yellow onion, chopped

1 tsp sugar

1 tsp minced garlic

1 sprig fresh sage leaves

3 ¼  cups low-sodium chicken broth

3  cups butternut squash, peeled, seeded, and cut into 1 ½ inch chunks

 1 ½ Tbs. Marsala wine

Salt and pepper to taste

¼ cup heavy cream

Lightly whipped cream for garnish

¼ cup hazelnuts, toasted and chopped 

In a stockpot over medium-low heat, warm the olive oil.  Add the pancetta and cook, stirring occasionally, until lightly crisp, 5-7 minutes.  Transfer to a paper towel-lined plate; reserve the oil in the pot.

Add the onion and sugar to the pot and cook, stirring occasionally, until the onion is tender and slightly caramelized, 8-10 minutes. Add the garlic and sage sprig and cook, stirring, for 1 minute.  Add the broth and squash and simmer, covered, until the squash is tender, 20-25 minutes.  Remove the sage sprig and discard.  Add the Marsala and season with salt and white pepper.  Simmer for 3 minutes, and then remove the pot from the heat.

Puree the soup in a blender until smooth, then whisk in the cream.  Ladle the soup into warmed bowls.  Garnish with the pancetta, a dollop of whipped cream, and hazelnuts.

Adapted from a Williams-Sonoma recipe 

Elizabeth