December 21, 2019

Today being National Poinsettia Day reminded me of other Christmas flowers, like Christmas cactus and a very good writing by our dear Carolyn Bush.
She is no longer with us but her writings live on! Enjoy!
They may go by many names, but whether you call them Weihnachtskaktus (German), Cactus de Noël (French), Cacto de Navidad (Spanish), Thanksgiving Cactus (American), Holiday Cactus (US) or even Crab Cactus (referring to the clawed ends of the stem), you can’t go to any garden center or grocery store this time of year without being tempted to buy a Christmas Cactus (Europe/US/Canada). But just how do you keep them healthy—and, as importantly, get them to bloom again next year. Like poinsettias, another holiday flower, there’s a trick to that.

What do You Know-This is Actually a Thanksgiving Cactus
According to Clemson Cooperative Extension, Thanksgiving cactus (Schlumbergera truncata) and Christmas cactus (Schlumbergera bridgesii) are popular, fall- and winter-flowering houseplants native to Brazil, where they grow as epiphytes on tree branches in shady rain forests. Their flowers are available in a wide variety of colors including red, rose, purple, lavender, peach, orange, cream, and white.
Strangely enough, what we call “Christmas cactus” and find most often in stores starting around November is most likely the Thanksgiving cactus (Schlumbergera truncata), as it blooms almost a month before Schlumbergera bridgesii. If you really want to impress your friends with your horticultural knowledge, the way to tell the two apart, according to the Clemson website, is to “look at the shape of the flattened stem segments, which are botanically called phylloclades. On the Thanksgiving cactus, these stem segments each have 2 to 4 saw-toothed serrations or projections along the margins. The stem margins on the Christmas cactus are more rounded.
A second method to distinguish between these two Schlumbergera species is based on the color of the pollen bearing anthers. The anthers of the Thanksgiving cactus are yellow, whereas the anthers on the Christmas cactus are purplish-brown.”
Since Holiday cactus originated in shady rain forests, it is best to grow them in light shade. The secret to good repeat flower production involves temperature regulation (do not let the temperature go over 90 degrees once the flower buds appear) and photoperiod (length of day and night) control. Fourteen hours or more of continuous darkness each day for at least six weeks is required for complete bud set to occur. Street lights, car lights or indoor lightening can disrupt the required dark period. My mother, who once grew a Christmas cactus so large and with so many buds that she donated it to a horticultural center when she moved, would put her Christmas cactus in a dark closet every night for six weeks starting in September.
Watering and fertilizing the Christmas cactus is fairly easy. Though Holiday cactus can tolerate being somewhat under-watered during the summer, once buds appear the soil should remain slightly moist or the buds may drop. Clemson recommends fertilizing once monthly with a dilute 20-20-20 fertilizer from the time new growth starts in the early spring. As Holiday cactus have a higher requirement for magnesium, Epsom salts (one teaspoon per gallon of water) can be used also, but not applied at the same time as the other fertilizer. The plants do best grown in well-drained soil and like being somewhat pot bound. The most common problem is over-watering which produces root rot.
Christmas cactus is easily propagated by cuttings, so if you are looking for a present to give to your gardening friends, you might try growing them yourself. However, whether you want to go to all the trouble of getting them to bloom or whether you just want to consider your Christmas cactus as a “holiday annual plant,” go ahead and purchase that beautiful Christmas cactus at the store. After all, what says “Holiday” to a gardener more than poinsettias and Christmas cactus.
Carolyn Bush
Picture by Starla
Tornadoes ripped through Dallas, October 20, 2019. What a loss for our city when you count property destroyed and trees uprooted or damaged.

Many of our beautiful trees were destroyed.
Eric Larner, Dallas County Master Gardener and Citizen Forester and Steve Houser, also a Dallas County Master Gardener and President of Arborilogical Services discuss what happened and what to expect in the paragraphs below. They also remind us-we have a lot of tree planting ahead!
Eric, do you have anything you would like to tell the readers of our blog about trees after the tornado?
From Eric Larner-Great questions – Of course, the damage a tornado (100+mph winds) against ANY tree is almost always 100% fatal to the survival of the tree no matter the size of the tree. But tornados take weird and strange paths(i.e. total destruction on one side of the street and very little damage on the other side).
I would refer you to Steve Houser on estimates of destruction to the city’s overall tree canopy. I do know that to replace the benefits of one very LARGE tree( 40-50” caliper) takes 150+ 3” trees planted and that would take around 25+ years to achieve. So you see, we will need to plant a lot of trees in our city.
A neighborhood class talking about medium – large shade trees would probably focus on alternative choices to red oaks and live oaks in the metroplex.
Eric Larner
From Steve Houser-As Eric noted, the damage often follow unusual paths. We had a storm in late June with 70 MPH winds that damaged properties in south Richardson all the way to downtown Dallas. One of the ten recent tornados contained over 140 MPH winds that took out houses and most (or all) of the trees on a property. Many huge Oaks were blown over and those that survived often had extensive damage.
Eric’s notes are accurate calculations regarding how long it takes to replace the biomass (or foliage) of one large tree. Although it replaces the biomass in 25 years, it does not replace a cool and old tree for around 100 years.
If you consider the losses from both the events noted above, a guess at the loss in canopy cover would be between 4 to 5%. Although it does not sound extensive, it was easily over 100,000 trees lost or damaged.
Trees lost or damaged included up to 90% of the canopy coverage in specific areas with 140 MPH winds and less in areas with 60-100 MPH winds.
We have handouts on recommended species. As Eric noted, Raincatcher’s Garden is a great demonstration garden for some of the choices.
Steve Houser
The Raincatcher’s Garden will host a tree class in early 2020.
As Eric said, it will be about tree selection, and also care of trees.
We will announce the date of the class in January, 2020.
To read some of our previous material about tree care, click on the links below.
Berms and Tree Planting at Raincatcher’s
Thank you, Eric and Steve.

Scented geraniums in the Edible Landscape before the freeze.
Our five pelargonium beds (scented geraniums) were beautiful. Brushing up against them or gently rubbing a leaf between your fingers, fragrant scents of everything from roses to peach and chocolate mint filled the air. But the weather forecast had prepared us. Below freezing temperatures were only days away and it was time to carefully dig them up for winter protection in our greenhouse.

Propagation class in session.
Paula Spletter to the rescue! Under her helpful guidance, each plant received a severe pruning leaving only one third of the plant intact for its winter location. Then the fun began. Over 200 stem cuttings were taken and repotted in preparation for a spring class at Raincatcher’s Garden of Midway Hills. Here are Paula’s basic tips for propagating scented geraniums:
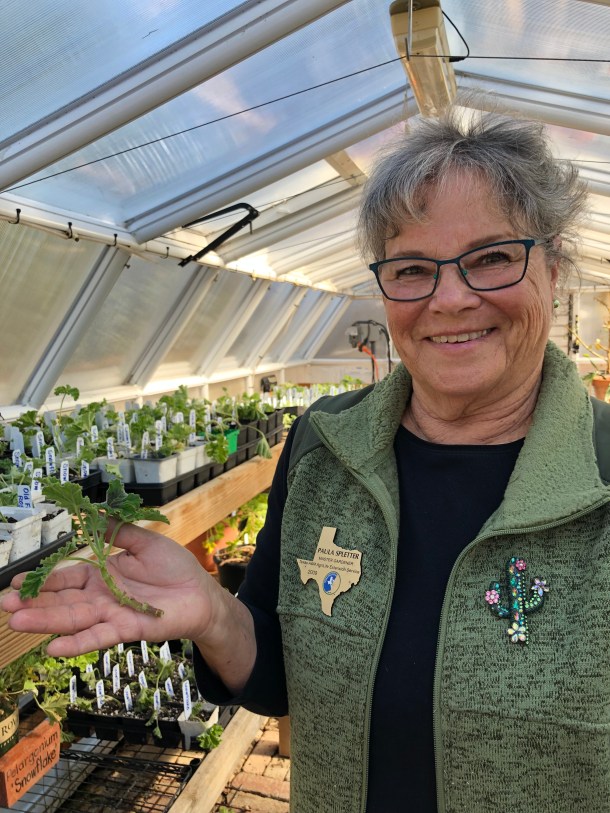
Paula Spletter showing us the perfect stem cutting.
*Temperature in the greenhouse should be 45˚ or higher. A heater is recommended for anything below this number.
*Soil should stay evenly moist; never too wet or completely dried out.
*Extremes in heat, cold, overwatering or underwatering could cause problems with mealy bugs or a fungus. Pay attention and adjust accordingly.

Scented geranium cuttings in our greenhouse labeled and ready for winter.
Watch for an announcement about our 2020 late spring/early summer class on the joys of growing scented geraniums in your garden. A tasting menu will inspire you to get started!
Linda Alexander
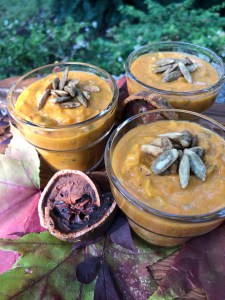
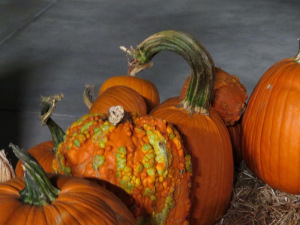
Pumpkins and Sweet Potatoes
Two harvest-season jewels that have become an intrinsic part of classic autumn fare.
“For pottage and puddings and custards and pies,
Our pumpkins and parsnips are common supplies,
We have pumpkins at morning and pumpkins at noon,
If it were not for pumpkins, we should be undoon”.
This Pilgrim Verse from sometime around 1633 was the introduction to our pumpkin segment of the ‘Grow and Graze’ program last Tuesday. Seems that our Pilgrim forefathers were just as enchanted with pumpkins as we are today. Susan Thornbury helped us to understand the history and fascination with this much-loved fruit/vegetable.
*The early colonists ate pumpkins because they were available and they badly needed food.
*Pumpkins are Cucurbits, just like cucumbers and summer squash. They need warm soil, plenty of sunshine and regular watering. Additionally, they tend to be large plants that need room to grow.
*Timing is important when it comes to growing pumpkins. Many varieties take 100 days to mature. But even more important is soil temperature. Pumpkins want soil that is warm, but seeds will not come up if the soil is too hot. For our climate, that means the end of May to the first part of June is the ideal time to plant pumpkin seeds. It is advantageous to plant seeds since they sprout easily when their requirements are met.
*Pumpkins will perform best when planted in one to two feet of loose fertile soil with plenty of compost added to the mix. Raised beds are a preferred way to grow pumpkins in our area.
*Squash vine borers can be devasting to a pumpkin crop. Usually appearing in springtime, prevention is the best way to deal with the problem. Check under the leaves often for egg clusters. If found, smash them. Insecticidal soap can be used for prevention but use caution as it can be harmful to bees which are essential for pollinating the flowers.
*When selecting a pumpkin for outdoor decorating look for one that is blemish free with no soft spots or damage to the rind. A bit of stem looks nice and may help the pumpkin to last longer.
*For cooking, select a small 2 to 3-pound pie pumpkin. If purchasing canned pumpkin, look for the cans that say 100% pure pumpkin. Libby pumpkin is made from a variety that the company developed called Dickinson.
Autumn Bisque
Ingredients
2 tablespoons extra-virgin olive oil, divided
2 tablespoons butter, divided
1 ½ cups chopped onion
1 tablespoon minced garlic
¾ cup chopped carrots
¼ cup chopped celery
4 cups chicken broth, divided
2 cups sliced mushrooms
1 cup chopped leeks
3 cups fresh or canned pumpkin puree
1 (13.5-ounce) can coconut milk
½ teaspoon red pepper flakes
1 ½ teaspoons salt
1 teaspoon fresh lemon juice
1 teaspoon fresh chopped thyme
Garnish: toasted pumpkin seeds
Directions
In a large stockpot over medium heat, melt 1 tablespoon olive oil and 1 tablespoon butter. Add the onion, garlic, carrots, and celery and cook for 8 minutes, or until the vegetables are tender.
Add 2 cups chicken broth and simmer for 3 minutes; remove from heat and cool for 15 minutes. Pour the broth mixture into a food processor or blender, and blend until smooth; set aside.
In the same stockpot over medium heat, heat the remaining olive oil and butter. Add the mushrooms and leeks and cook for 6 minutes or until mushrooms begin to brown.
Add the remaining broth, vegetable-broth puree, pumpkin, coconut milk and red pepper flakes; simmer, covered, for 15 minutes. Stir in the salt, lemon juice and thyme; simmer for 10 minutes. Garnish with toasted pumpkin seeds, if desired.
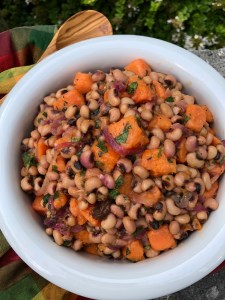
Black-Eyed Pea-And-Sweet Potato Salad
Ingredients
2 medium-size sweet potatoes, peeled and cubed
1 purple onion, quartered and thinly sliced
1 tablespoon vegetable oil
2 garlic cloves, minced
1 teaspoon dried basil
1 teaspoon dried thyme
½ teaspoon ground cumin
½ teaspoon ground coriander
⅓ cup lime juice
½ cup mango chutney
3 (15.8-ounce) cans black-eyed peas, rinsed and drained
½ cup chopped fresh Italian parsley
1 teaspoon salt
1 teaspoon pepper
Directions
Bring potato and water to cover to a boil in a large saucepan over medium heat. Cook 15 minutes or until potato is tender. Drain and set potato aside.
Sauté onion in hot oil in saucepan over medium heat 4 minutes or until tender. Add garlic and next 4 ingredients. Cook, stirring constantly, 1 to 2 minutes.
Stir together lime juice and chutney in a large bowl; add potato, onion mixture, peas and remaining ingredients, tossing gently to coat. Cover and chill at least 1 hour.
Yield: 6 to 8 servings
Linda Alexander
Harvest Salad with Bacon Vinaigrette

Ingredients
1 baking pumpkin, peeled, seeded, and cut into 1 ½-inch -thick slices
¼ cup melted butter
1 ½ teaspoons salt, divided
1 teaspoon freshly ground black pepper, divided
¼ teaspoon garlic powder
1 cup extra-virgin olive oil
⅓ cup balsamic vinegar
8 slices bacon, cooked and crumbled
1 shallot, minced
6 cups salad greens
¼ cup grated Parmesan cheese
¼ cup toasted pecans
Directions
Preheat oven to 350˚F. Lightly grease a large baking sheet.
Place the pumpkin slices 1 inch apart on the prepared baking sheet. In a small bowl, whisk together the melted butter, ½ teaspoon salt, ½ teaspoon pepper, and garlic powder; evenly coat pumpkin slices with the butter mixture. Roast pumpkin for 20 minutes, or until tender.
Using a food processor, mix together the oil, vinegar, remaining salt, remaining pepper, bacon, and shallot until well blended.
In a large bowl, toss the salad greens with ¾ cup of the vinaigrette. Mound the greens on a serving plate, and top with roasted pumpkin. Drizzle the remaining vinaigrette over the pumpkin, and top with the Parmesan cheese and pecans.
Yield: Makes 6 servings
Curried Pumpkin Hummus

Ingredients
1 (15-ounce) can pumpkin
3 tablespoons tahini (sesame paste)
2 tablespoons fresh lemon juice
1 clove garlic, peeled
2 teaspoons olive oil
1 teaspoon curry
1 teaspoon cumin
½ teaspoon kosher salt
½ teaspoon ground black pepper
¼ teaspoon cayenne pepper
Garnish: pepitas, (pumpkin seeds), paprika, olive oil, and fresh thyme
Directions
In the work bowl of a food processor, combine pumpkin, tahini, lemon juice, garlic and olive oil. Pulse until smooth. Add curry, cumin, kosher salt, black pepper and cayenne pepper; pulse to combine. Cover with plastic wrap and refrigerate for at least 2 hours. Garnish with pepitas, paprika, olive oil and thyme, if desired. Serve immediately with toasted naan or pita chips or refrigerate in an airtight container for up to 5 days.
Yield: Makes 10 servings
Pumpkin Chai Pots de Crème

Ingredients
1 cup whipping cream
1 cup whole milk
¼ cup firmly packed light brown sugar
6 large egg yolks
¼ cup granulated sugar
½ cup canned cooked pumpkin
⅓ cup strong brewed chai tea
2 teaspoons grated orange peel or Meyer lemon peel
1 teaspoon vanilla
Pumpkin seed brittle
Directions
Preheat oven to 325˚F (convection not recommended). In a 2-to3-quart pan over medium heat, stir cream, milk, and brown sugar until sugar is dissolved, 2 to 4 minutes. Remove from heat.
In a bowl, whisk egg yolks until light yellow. Add granulated sugar and whisk until blended. Gradually whisk a fourth of the hot cream mixture into the egg mixture. Then slowly whisk in remaining cream mixture and the pumpkin, chai, orange peel, and vanilla.
Divide mixture among six ramekins (¾ cup). Set in a 12- by 16-inch roasting pan at least 2 inches deep. Set pan in oven and pour in boiling water to halfway up sides of ramekins.
Bake until custards barely jiggle when gently shaken, 45 to 50 minutes. Lift ramekins out of water and let cool on racks for 30 minutes, then chill until cold, at least 1 hour. Cover when cold.
Shortly before serving garnish with shards of pumpkin seed brittle.
Yield: Makes 6 servings
Pumpkin Seed Brittle Recipe
Maple Sweet Potato Bread Pudding
Ingredients
1 ½ pounds small sweet potatoes, or 3 large sweet potatoes
5 eggs
2 cups heavy cream
2 cups whole milk
1 cup maple syrup, plus additional for serving, warmed
½ cup firmly packed light brown sugar
2 teaspoons vanilla extract
1 ½ teaspoons ground cinnamon
½ teaspoon ground nutmeg
½ teaspoon kosher salt
1 (1 pound) loaf challah bread, cut into 1 ½- to 2-inch cubes (12 packed cups)
Ice cream or whipped cream
Directions
Preheat the oven to 400˚F. Wrap the sweet potatoes in foil and bake until tender when pricked with a fork, 50 to 60 minutes. Carefully unwrap the foil and let them stand until they are cool enough to handle. Remove the skins and place the cooked sweet potatoes in a bowl. Mash coarsely using a potato masher. Lower the oven temperature to 375˚F.
In a large bowl, whisk the eggs until frothy. Whisk in the cream, milk, the 1 cup maple syrup, the brown sugar, vanilla, cinnamon, nutmeg and salt. Stir in the sweet potatoes. Add the bread cubes and stir to mix thoroughly. Let stand for 15 minutes for the bread to soak up the liquid, stirring occasionally. Butter a 9 by 13-inch baking dish. Pour the bread mixture into the dish, cover tightly with aluminum foil, and bake until the pudding is set in the center, 50 minutes to an hour. Uncover the baking dish and cook until browned on top and a knife inserted in the center comes out clean, about 15 minutes. Serve warm, drizzled with the warm maple syrup and topped with ice cream or whipped cream
Yield: Makes 9 to 12 servings
Linda Alexander
Pictures by Linda and Starla Willis
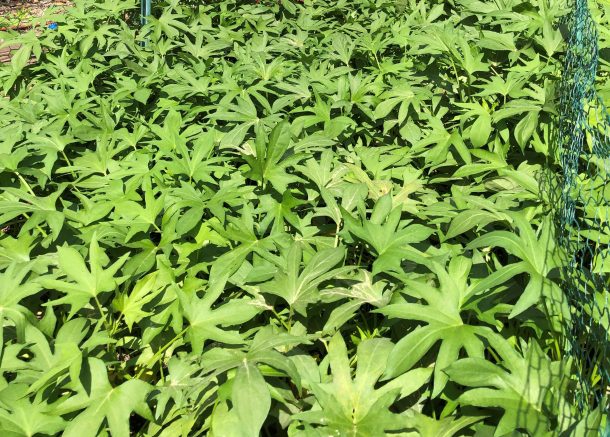
Beauregard Sweet Potatoes in Sheila’s Garden
Sheila Kostelny led the sweet potato segment of the panel discussion, sharing some insightful information about what many consider to be one of the world’s most nutritious vegetables.
*We have Christopher Columbus to thank for discovering the sweet potato on one of his voyages to the West Indies. He was so impressed that upon his return to Spain, he brought some back to Queen Isabella. Later explorers found sweet potatoes growing in much of Central and South America. Most historians think the sweet potato arrived in the U.S. after Columbus, as a result of trading between the early American settlers and the West Indians.
*The sweet potato belongs to the Morning Glory Family (Convolvulaceae). Its scientific name is Ipomoea batatas.
*The yam belongs to the Yam Family (Dioscoreaceae). Its scientific name is Dioscorea Species.
*The confusion between sweet potatoes and yams started when early slaves mistook the sweet potato for a yam (which is grown in Africa). It wasn’t long before sweet potatoes were commonly referred to as yams, especially in the South. Yams are rarely found in American markets. (*Fortunately, we did find yams from Costa Rico a few weeks ago at our local Walmart).
*Many supermarkets use the terms sweet potato and yams interchangeably.
*All crops grown in the U.S. are sweet potatoes with the largest crop grown in North Carolina. Yams are imported from the Caribbean but are difficult to find.
*Other than being from two different plant families, the sweet potato is a storage root and the yam is a tuber. Other differentiating characteristics:
Sweet potato: smooth, with thin skin. Short, blocky shape with a moist, sweet flavor. High in beta carotene (Vitamin A). Propagated by transplanted or vine cuttings with a 3 to 5 month growing season.
Yam: long and cylindrical with a dry and starchy taste. Low in beta carotene. Propagated by tuber pieces with a 6 to 12 month growing season.
*Growing sweet potatoes:
Purchase sweet potatoes for cuttings or slips from local nurseries in late spring. Allow the cuts to scar for a few days and, as with regular potatoes, include 3 or 4 eyes, if not sprouted. Plant the slips or cuttings deep, with at least 3 nodes below ground or 3 to 4” deep and 12 to 16 inches apart.
It’s also fun to try the “second-grade” sweet potato vine method, which is to root a sweet potato suspended in water using toothpicks.
Unlike most vegetable crops, sweet potatoes do not do better with high levels of organic matter. They need loose soil with good drainage…raised beds are ideal. Sweet potatoes are fairly drought tolerant but do appreciate moist soil.
Sweet potatoes demand warm growing conditions. Do not plant until all possibility of frost has passed. As soon as the soil temperature is at least 60˚F, plant 2 inches below the surface. They need at least 8 hours of sun each day for maximum yield.
Ideally, incorporate 1 pound per 100 sf of bed with a complete lawn or garden fertilizer or an organic fertilizer, per instructions, to the soil before planting. Ideal ph is 5.5 to 6.5.
Harvesting:
Generally ready in 90 to 110-120 days. Peak harvest season being October to December. Some say a light frost will sweeten the taste. Harvest before a hard frost.
Sweet potatoes don’t actually mature but are dug when they reach a usable size. Dig very carefully in dry soil. (They may be kept in the ground to continue sizing but should be dug up before the soil temperatures drops below 50˚F to prevent chill injury).
Cut the roots away from the spuds and allow them to dry for 3 to 4 hours in the shade before placing in a warm, humid area to cure for at least 2 weeks, which turns their starches to sugar.
Ideal curing temperature is 80˚-85˚F with 85 to 90% humidity.
Proper Storage:
Ideal storage temperature is 55˚ to 60˚F in darkness with moderate humidity. The average storage life is 4 to 6 months. Allow good air circulation.
Recommended varieties for our area (Zone 8):
Beauregard (perhaps the world’s most popular sweet potato…favored for high yields of uniform, reddish potatoes with tasty, deep-orange flesh that keeps well in storage. Developed at Louisiana State University in 1987), Centennial and Jewel.
Sweet potatoes are not only a nutritious and tasty vegetable, the skin and flesh are excellent sources of fiber. And, this very versatile vegetable, along with the turkey, makes our Thanksgiving feast complete.
Here’s one of our favorite sweet potato recipes to get us started after our recent Grow and Graze event-Pumpkins on Parade, Sweet Potatoes for Adornment.
Sweet Potato Crescent Rolls
Ingredients:
2 packages active dry yeast
1 cup warm water (105˚ to 115˚)
1 cup cooked mashed sweet potato
½ cup shortening
½ cup sugar
1 egg
1 ½ teaspoons salt
5 ¼ to 5 ¾ cups all-purpose flour
¼ cup butter, softened
Directions:
Yield: 3 dozen
More recipes coming!
Linda Alexander
PLEASE NOTE: The time for this event has been moved back a half hour to begin at 10:30. Lunch will begin at 11:30. We hope this will help with storm-related traffic issues.
You may need to allow extra time to get to the garden. Midway Road between 635 and Royal Lane is open, but it may still be closed near Walnut Hill Lane, which is generally still barricaded. Forest Lane is a reasonably good east-west route, but 635 might be better due to traffic signals being out on Forest at the Central Expy and Hillcrest intersections.
Good luck and hope to see you at the garden!
“Pumpkins on Parade, Sweet Potatoes for Adornment”
If you click the eventbrite link below, you can ask for a reminder one hour before tickets go on sale!
Join us for an in-depth look into these harvest-season jewels that have become an intrinsic part of classic autumn fare.
Tuesday, October 22nd
A ‘Grow and Graze’ Event Hosted by the Raincatcher’s Garden of Midway Hills
10:00 – 11:00am * 11001 Midway Road * Church Sanctuary
Free Program by Raincatcher’s Vegetable Experts
Immediately following the program, please join us in the Community Hall for Lunch
11:00 – 12:30
$15 per person, Reserved seating for 60, Ticket Sales Begin September 24th
Deadline Tuesday, October 8th
For Lunch Tickets, visit https://www.eventbrite.com/e/pumpkins-on-parade-sweet-potatoes-for-adornment-tickets-72885583743
(Master Gardeners earn two CEU’s if attending both events)
Menu
Curried Pumpkin Hummus with Toasted Pita Chips
Autumn Bisque
Harvest Salad with Bacon Vinaigrette
Sweet Potato and Black-eyed Pea Salad with…
View original post 28 more words

Basil Bed Before Harvest
We had a party…a “Pesto Party” …and it was a chopping, blending and pulsing success. Our Edible Garden raised basil beds yielded some of the most beautiful plants we’ve ever seen. And, with a new drip irrigation system going in on Tuesday, all the plants had to be cut back rather severely. It was time to rally the troops and make good use of our harvest.
Two “favored” recipes, slightly adapted, served as the basis for our pesto making adventure. Each participant was encouraged to personalize their recipe. While some chose to stay with tradition, others brought an assortment of ingredients including everything from walnuts and pecans to a yeast substitute for the Parmesan cheese. Our garden, of course, provided the basil – three different varieties to be exact: Cardinal (cinnamon/clove flavor with hints of anise), Eleonora (somewhat spicier flavor than traditional pesto types) and Persian (a distinctive aroma, both lemony and spice like).
Once the food processors began their whirring magic, the next important decision was chunky or smooth. Those in favor of a smoother texture watched closely as more olive oil was slowly drizzled into the mix. If your twist happened to be chunky, only a few short pulses and it was done. More salt or lemon juice, each person had to make that call, as well.
Amidst all the chatter and finger licking swipes, it was hilariously entertaining to see each batch being scooped out of the processors. Varying shades of green, silky smooth texture or visibly chunky little pieces of spinach and nuts didn’t matter. Each jar was filled with a pesto that yielded its own distinct personality. And, our chefs were thrilled to take home over 30 jars of garden-fresh pesto for their personal enjoyment or to share with family and friends.
*If you have basil that’s ready for harvesting, try one of our favorite recipes included below.

Pesto After Basil Harvest
Spinach Basil Pesto
Ingredients
1 ½ cups baby spinach leaves
¾ cup fresh basil leaves
½ cup toasted pine nuts
½ cup grated Parmesan cheese
4 cloves garlic, peeled and quartered
¾ teaspoon kosher salt
½ teaspoon freshly ground black pepper
1 tablespoon fresh lemon juice
½ teaspoon lemon zest
½ cup extra-virgin olive oil
Directions
Blend the spinach, basil, pine nuts, Parmesan cheese, garlic, salt, pepper, lemon juice, lemon zest, and 2 tablespoons olive oil in a food processor until nearly smooth, scraping the sides of the bowl with a spatula as necessary. Drizzle the remaining olive oil into the mixture while processing until smooth.
Yield: 24 servings
Classic Pesto
Ingredients:
3 large cloves garlic
3 cups loosely packed fresh basil leaves
½ cup pine nuts, lightly toasted
½ cup coarsely grated Parmigiano-Reggiano cheese
1 teaspoon salt
½ teaspoon freshly ground black pepper
½ cup extra-virgin olive oil
Directions:
Yield: About 3 cups
Linda Alexander
October 11, 2019
I’m late. I should have been making space for fall vegetables in my 8x 10′ garden in August. My excuse is that the squash and basil were still producing and I had a fervent hope that my cucamelon vines would finally spring forth with those tiny cute cucamelons (alas, it did not).
My good friend, Sheila Kostelny, however, planted her garden in a timely manner. It’s the garden I’ve been dreaming about.
She has planted seeds of beets, carrots, spinach and 3 varieties of peas.

 And already in the garden are transplants of Bright Lights Swiss Chard, Southern Giant Curled Mustard, Tiger Collards, and garlic.
Below are her Beauregard Sweet Potatoes which are arguably the world’s most popular sweet potato. It’s popularity comes from producing high yields of uniform, reddish-purple potatoes with tasty, deep-orange flesh.

By the way, Sheila will be teaching how to grow sweet potatoes at our next Grow and Gaze event on October 22. Tickets for the lunch are sold out but the lecture is free and open to anyone who wants to attend.
For anyone else who is just now working on a fall garden, you can purchase transplants of broccoli, beets, Brussel sprouts, cabbage, swiss chard, lettuce, mustard greens, spinach and other cool season crops at your local garden center.
I’ll see you there!
Ann Lamb
