Category Archives: Vegetable Gardening in Dallas

Radish Reminders and Onions

Sow radish seeds early February through mid- April. We enjoyed them all through fall and winter and now get a second chance. Radishes are perhaps one of the most satisfying crops because they germinate quickly and profusely from seed but don’t forget to thin them! At approximately two weeks old or one inch in height, snip off the leaves and add the tops right into your salad bowl. In fact, you can eat radish tops anytime. They are one of the “root to leaf” crops being touted by American chefs and gardeners.

Above: Stunted Radishes, No Room to Grow

Above: Stunted Radishes, No Room to Grow

A word from Jerry Parsons,  Ph.D., horticulture specialist with the Texas Cooperative Extension in San Antonio:  “Plants require a certain amount of space for optimum root expansion and foliage growth if maximum production is expected.” The key words to understand are “optimum” and “maximum” . Plants limited by space restrictions will produce, but not to the maximum. They will grow, but not in the optimum condition. This is true for those vegetables which need space to physically expand (the radish, turnip, onion bulb) as well as all vegetables which need the intensity of sunlight to energize the chlorophyll of cells to insure optimum functioning of plant processes and, consequently, maximum production.”

Radishes from our Garden, Properly Thinned

Radishes from our Garden, Properly Thinned

Onions-you have probably already planted them or are “fixin” to get them into the ground.

Above: Onion Sets Ready to be Planted

Above: Onion Sets Ready to be Planted

Remember to allow space for them to grow. Judge this by the expected size of the variety you are planting.

For example, green onions need less space than the larger bulbs of 1015Y onions. Spring is coming! Here’s what you can look forward to as an onion grower.

No worries about how to eat these crops. The Dallas County Master Gardener Cookbook, A Year On The Plate, will have plenty of recipes. (Publishing Date To Be Determined) But just like spring, it’s coming!

Onion Planting Advice : The Lowly Onion

Ann

Pictures and Video by Starla

Oh, oh, oh and don’t forget National Seed Swap Day at Preston Forest, Whole Foods Market today from 12-4.

Master Gardeners  will be there with seed activities and seeds to give away.

Winter at Raincatcher’s

Green and Red Mustard Greens at The Raincatcher's Garden of Midway Hills

Green and Red Mustard Greens at The Raincatcher’s Garden of Midway Hills

If you have been eating your way through the garden this winter, no doubt you are acquainted with the  brassica family.  Members of this family include arugula, cabbage, cauliflower, broccoli, Brussels sprouts, kale, rutabaga, turnips, radishes, collard greens and mustard greens. They are cool season vegetables, planted in the fall in Dallas, Texas and harvested all through our mild winter.

Right now I am smacking my lips thinking of the cauliflower picked and  prepared at Linda’s yesterday. The recipe will be in our new Master Gardener cookbook, A Year on the Plate, which we hope, hope, hope to publish this year.

Along with harvesting and enjoying winter veggies, you should be planting onions now.  Onion planting instructions and recipes are all through our blog. You can’t escape them.

Ann

Pictures by Starla

What’s coming up in 2016?

Seed Swap Day at Whole Foods at Preston Forest, January 30

More information about our cookbook, A Year on the Plate.

A how-to video about braiding onions so you will remember to get yours planted right away


Fall Tomatoes at The Raincatcher’s Garden

Listen to Dorothy! I always do! Here’s our fall tomato report:


We have talked about green tomatoes almost as much as red, ripe tomatoes:

Green Tomato Primer

Fried Green Tomatoes

Dorothy’s Chow Chow

Fall Tomatoes

Ann

Video by Starla

Want To Try A Different Vegetable?

Now here’s a Jeopardy question that might have stumped even the best contestant:

Answer: A subtropical vine that has beautiful white fringed, lacy flowers that have a sweet perfume, leaves that when crushed smell like “hot buttered popcorn,” and edible fruit that can grow up to three feet or more long and looks like a creature.

Question: What is Snake Gourd?

Snake Gourd Growing at Hope Garden

Snake Gourd Growing at Hope Garden

Snake Gourd (genus Trichosanthes, which is Greek for “hair flower”) is an edible gourd grown throughout India, Australia and Insular and Mainland Southeast Asia. Because it loves hot, humid climates, it is a good plant to grow in our hot, humid Dallas summers. Though most snake gourds can grow to enormous lengths, there is a shorter variety, called Snake Gourd India Short which grows only to about four to six inches.


All true edible snake gourds, Trichosanthes anguina or T. cucumerina, get soft when ripe and usually disintegrate on the vine, unlike many mature gourds that form a hard shell. They are eaten when very immature, while the fruit is tender and the seeds are still soft.   The mature fruit turns bright orange when ripe and has seeds surrounded by a bright red pulp. The mature fruit often breaks open spilling the contents, which look like big clots of blood (hence the name “anguina”). The red pulp is sweet to the taste and considered a delicacy by Southeast Asian children.

Snake gourd seeds can be planted in full sun in late spring after the soil is warm. The seeds have a hard coat and need to be soaked overnight. Though the vines can sprawl on the ground, they do best when grown on a sturdy trellis. Trellised snake gourds, especially those with stones tied to the blossom end, tend to be straighter than the curved gourds that are left to grow on the ground. The fruit of the India Short variety is picked just before it turns from moist to dry feeling. The longer varieties are harvested when they are about 16-18 inches. With a taste reminiscent to cucumbers and texture similar to zuchinni squash, Snake Gourd can be fried, stuffed or boiled.   It is also good in soups and stir-fry. Snake Gourd is often used in Indian dishes and there are many recipes using it on the internet.

Finding edible snake gourd seeds is somewhat difficult. I recently tried to order on Ebay seeds of Snake Gourd India Short from a grower in India. However the seeds were confiscated at US Customs. There are however several seed companies that sell the edible long variety, so check on the internet. However, just be sure that you are ordering edible Snake Gourds, either Trichosanthes anguina or T. cucumerina. There is another ornamental, hard shelled variety that is used in crafts that is readily found in seed racks even in our big box stores. Though they would be fun to grow, they are not edible.

Carolyn

A Texas Connection

Capsicum annuum var. glabriusculum

Capsicum annuum var. glabriusculum

Most people know of Thomas Jefferson (1743-1826) as the main author of the Declaration of Independence and that he was the third president of the United States.   However we gardeners know that he was also an avid gardener who collected and grew as many as 300 cultivars, representing 99 species of vegetables and herbs, during his 15 year retirement at Monticello. However, did you know that one of the experimental vegetables that he grew has a Texas connection?

Around 1812, Capt. Samuel Brown, who was stationed in San Antonio, sent Jefferson seeds of a bird pepper, Capsicum annuum var. glabriusculum. According to the seed packet from Monticello, Capt. Brown said that the dried peppers were as “essential to my health as salt itself.” He went on to say “The Spaniards use it in fine Powder & seldom eat anything without it. The Americans…make a pickle of the green Pods with Salt & Vinegar which they use with Lettuce, Rice, Fish, etc.”

Jefferson planted what he called “Capsicum Techas” in pots at Monticello and hoped it would be a hardy variety of pepper at his home. He also sent the seeds to a Philadelphia nurseryman, Bernard McMahon, who sold it as an ornamental pepper in Pennsylvania. Food historian William Woys Weaver said that “Old Philadelphians used the potted peppers as a winter table ornament or as window sill plants. The peppers themselves were used to make pepper vinegar, pepper sauce, or pickles.”

Though Jefferson called the pepper “Capsicum Techas,” like many plants it has several common names. One of the common names for the pepper is McMahon’s Texas Bird Pepper, but it also goes under the names of Pequin, Tepin, Petin, Chiltepin, Bird’s Eye Pepper, and Turkey Pepper. The Aztecs called it “chilli” and many people know it by another common name, Chili pequin.

Texas Bird Pepper is the only pepper native to North America. In fact, it is considered to be the official wild pepper of Texas. It gets its name “bird pepper” from the fact that birds, who are not sensitive to the extremely hot taste of capsaicin, love to eat the fruits, which are high in Vitamins A and C. The birds then distribute the seeds through their droppings.

Chili Pequin or Texas Bird Pepper, Common Names

Chili Pequin or Texas Bird Pepper, Common Names

The plant itself is about 12 inches tall and has a compact shape with bright green pointed leaves. The tiny (about ¼”), sparkling round or bullet-shaped red fruits were described by Jefferson as “minutissimum.” But don’t let their miniscule size fool you. They are hot! Very hot! Often 7-8 times hotter on the Scoville Scale than jalapenos’ 30,000-60,000 units.

Though the peppers originated in Central America and are considered reliably perennial in plant hardiness zones 9 through 11, here in Dallas they will often freeze to the ground but come back from the roots once the temperature warms. Because of their ornamental look, they also make a good container plants and can be protected in a greenhouse during the winter. Unlike many peppers that require full sun, Texas Bird Peppers also do well in part shade, though they do get a little leggy. They have few diseases, are drought tolerant, and need little fertility.

They can be used in any recipe requiring hot peppers—but remember to add just one or two little peppers, as their heat can go a long way. One of the most popular uses for the peppers is to make pepper vinegar. The commercial hot sauce brand Cholula lists bird peppers as one of its ingredients. Recipes for pepper vinegar can be easily found on the internet.

So, if you are looking for a very pretty plant with an interesting history, remember the Texas Bird Pepper. Just don’t forget: they are hot!

Carolyn

Pictures Courtesy of http://www.wildflower.org

Chili Pequin is beckoning butterflies at The Raincatcher’s Garden. We have two!

It’s Fall at the Garden, Maybe you Didn’t Realize

Celebrity Tomatoes on the Vine

Celebrity Tomatoes on the Vine

It’s been a good year for tomatoes in Dallas. Dorothy, one of our veggie garden experts, talks about her tomatoes as if they were her best friends. “The Celebrities, the Cherokees and Zebras have been fabulous. I couldn’t pick a favorite.  The Zebras and Cherokees are heirloom, which usually just give me one good round, but with this weather, they have stayed covered. ”

So imagine my surprise when Dorothy told me to radically cut back my tomato plants now and prepare for fall!  She leaves only the limbs bearing large tomatoes, all others are cut to a height of 3 feet.  The smaller tomatoes literally go into the skillet to become fried green tomatoes.

She recommends foliar feeding with fish emulsion every two or three weeks to help the  tomato plants rebound for fall.

Trash the  dead or diseased tomato plants,  they are not worth saving.

What else is Dorothy doing about fall?  Seeds of Carrots, Beets, Kale, Contender and Gold Rush Green Beans, and Oats are being planted at The Raincatcher’s Garden. A few new tomato transplants will be added and  hope abounds for the tomato plants who endured the harsh pruning.

When it gets a little cooler; lettuce, spinach and snow pea seeds along with broccoli and Brussel sprout transplants will be added.

Thank you, Dorothy, now what time is that dinner of friend green tomatoes?

Ann

Pictures by Starla

Hoemgrown Tomato Atop a Bed of Rosemary

Homegrown Tomato Atop a Bed of Rosemary

Fall back on some of our good advice: Fall, What’s not to Love and Fall Crops for Dallas Veggie Gardens 


Fried “Green Potatoes?”

 If you are a southerner, you probably know that unripe, green tomatoes, when fried or made into chutney, can be a culinary delight.  However, green potatoes?  AVOID THEM!!


Neon Green Potato from Carolyn's Garden, Not Photo Shopped! Beware, Even Green Tinged Potatoes Should not be Eaten.

Neon Green Potato from Carolyn’s Garden, Not Photo Shopped! Beware, Even Green Tinged Potatoes Should not be Eaten.

Now is the time that many vegetable gardeners are harvesting the potatoes that they planted in late January-February.  If, as recommended, you have been hilling up soil against the stem of the potato or kept adding soil and compost to a potato bin, the odds are good that you will not find any “green” potatoes.  However, if the ever-growing bunches of potatoes have managed to heave themselves out of the ground and are exposed to sunlight or if the potatoes have been exposed to extremes of heat or cold — beware.  Those greenish potatoes can be potentially deadly.   In fact, even potatoes brought from the store, if not properly stored in a cool, dry, dark place, can develop a greenish tint if exposed to too much light.

The greenish hue that can be found on potatoes exposed to light is actually chlorophyll.  Not a bad thing, you say, because we eat chlorophyll in many leafy greens.  However in the potato, the presence of chlorophyll also indicates the presence of solanine, a glycoalkaloid poison found in species of nightshade.  This bitter nerve toxin crystalline alkaloid is part of the plant’s defense against insects, disease, and predators.  It is found primarily in the stems and leaves of potatoes but can also be found on any green spots on the skin of a potato and on buds.

Solanine interferes with the body’s ability to transmit impulses between cells.  Ingested in large enough quantities, it can cause vomiting, diarrhea, headaches and even paralysis of the central nervous system.  Though an average adult would have to eat a very large quantity of green tinged potatoes (which are often quite bitter, a good warning sign) to have neurological damage, children may be more susceptible to ill effects.  In general, it is probably best to throw away any potatoes that have green eyes, sprouts, or greenish skins.

As B. Rosie Lerner, Extension Consumer Horticulturist at Purdue University says: “The next time you see a green potato, be thankful for that color change.  It’s warning you of the presence of toxic solanine.”

Carolyn

Picture by Carolyn

More info about potatoes :

Vegetable Planting in January

One Potato, Two Potato, Hopefully More


Beginnings

The dirt’s flying at the new Rainctcher’s Garden-into the new raised vegetable beds on the north field.

Straight rows of onions stand like little soldiers, the first vegetables planted at the new garden. We planted one bunch each of 1015y (yellow) and Southern Belle Red (red). Potatoes are next!

 Our First Onions Planted at The Raincatcher's Garden!

Our First Onions Planted at The Raincatcher’s Garden!

The top 12 inches of the beds have been filled with a generous gift of Vegetable Garden Mix from Living Earth Technology, made of compost, sandy loam, aged mulch, and other ingredients.  We topped it off with some of our homemade compost.

Living Earth, Sarah, and Judy!

Living Earth, Sarah, Tim, and Judy!

Last week the first of our trees, an urban forest demonstration was planted. Expect to see more about berm building and tree planting next week.

Ginko Tree Planted February 19, 2015

Ginkgo Tree Planted February 19, 2015

Pictures by Starla

Writing taken from Jim and Elizabeth emails

Onion Peelings here.

Onion Recipe

Ann


Growing Asparagus

Jerry Parsons and Sam Cotner, Extension Horticulturists
Texas AgriLife Extension Service

Asparagus is a highly productive vegetable best suited to cooler areas of North and West Texas. Grown for the stems or spears, a well tended planting yields 8 to 10 pounds or more per 100 square feet of bed or 24 to 30 pounds per 100 feet of row. For most home gardeners, one row is adequate. 

An asparagus planting lasts 15 to 25 years without replanting if it is well cared for and the climate is suitable. It does not do well if summers are extremely hot and long and winters are mild. 

Asparagus is grown from 1-year-old plants or “crowns” planted in January or February. Crowns grow from seed planted in flats or peat cups in October for January transplanting, or they are transplanted from an existing asparagus bed. To get healthy, vigorous plants, buy 1-year-old crowns from a nursery or garden center or order them from a seed catalog. It takes 1 year to grow a good crown. 

It requires 3 years from the time the crown is planted until the bed is in full production. Buds arise from the crown when conditions are favorable and develop into edible spears. If these spears are not harvested and are allowed to continue growing, they develop into “fern-like” stalks. 

From these “ferns”, the mature plant manufactures food and stores it in “storage roots.” This reserve supplies the energy necessary to produce spears the following year. 

Asparagus does best in a deep, well-drained soil with full sunlight. 

Soil Preparation 

Since an asparagus planting lasts many years, good seedbed preparation is essential. The soil should be free of trash, soil insects and weeds such as johnsongrass and bermudagrass before planting. 

In late fall, spread a 3-inch layer of organic matter such as manure, rotted sawdust or compost over the beds. Till or spade to a depth of 10 to 12 inches and turn the soil so all organic matter is covered. Asparagus grows well in high pH soils but does not do well if the soil pH is below 6.0. Test the soil before planting the beds and add lime if needed to adjust the pH to 6.5 to 7.0. 

Fertilizing 

Before planting new asparagus beds, till in 2 to 3 pounds of 10-20-10 or a similar analysis fertilizer per 20 feet of row or as directed by a soil test report. 

For established beds scatter 1 to 2 pounds of 10-20-10 fertilizer per 20 feet of row before growth begins in the spring, late January or early February in most areas of Texas. Add an additional 1 to 2 pounds per 20 feet of row after the last harvest. If available, use a nitrogen fertilizer such as 21-0-0 at this time. Water the fertilizer into the soil. Low fertility can cause fibrous spears. 

Varieties 

Martha Washington, UC 157, Jersey Giant and Mary Washington tests have shown hybrid asparagus varieties produce more than the standard varieties, but they are not widely available to home gardeners. 

Planting 

Since asparagus will be in the same place several years, it is important to select the right spot. Asparagus plants make a good border around the edge of a garden or along a fence. 

After asparagus beds are tilled, mark rows 4 to 6 feet apart. Dig a furrow 4 inches wide and 6 to 12 inches deep. Place the crowns in the furrow, cover with 2 to 3 inches of soil and firm the soil around the roots. Do not fill the entire furrow at once. Plant crowns 6 to 12 inches deep in loose soils and 4 to 6 inches in heavier soils. 

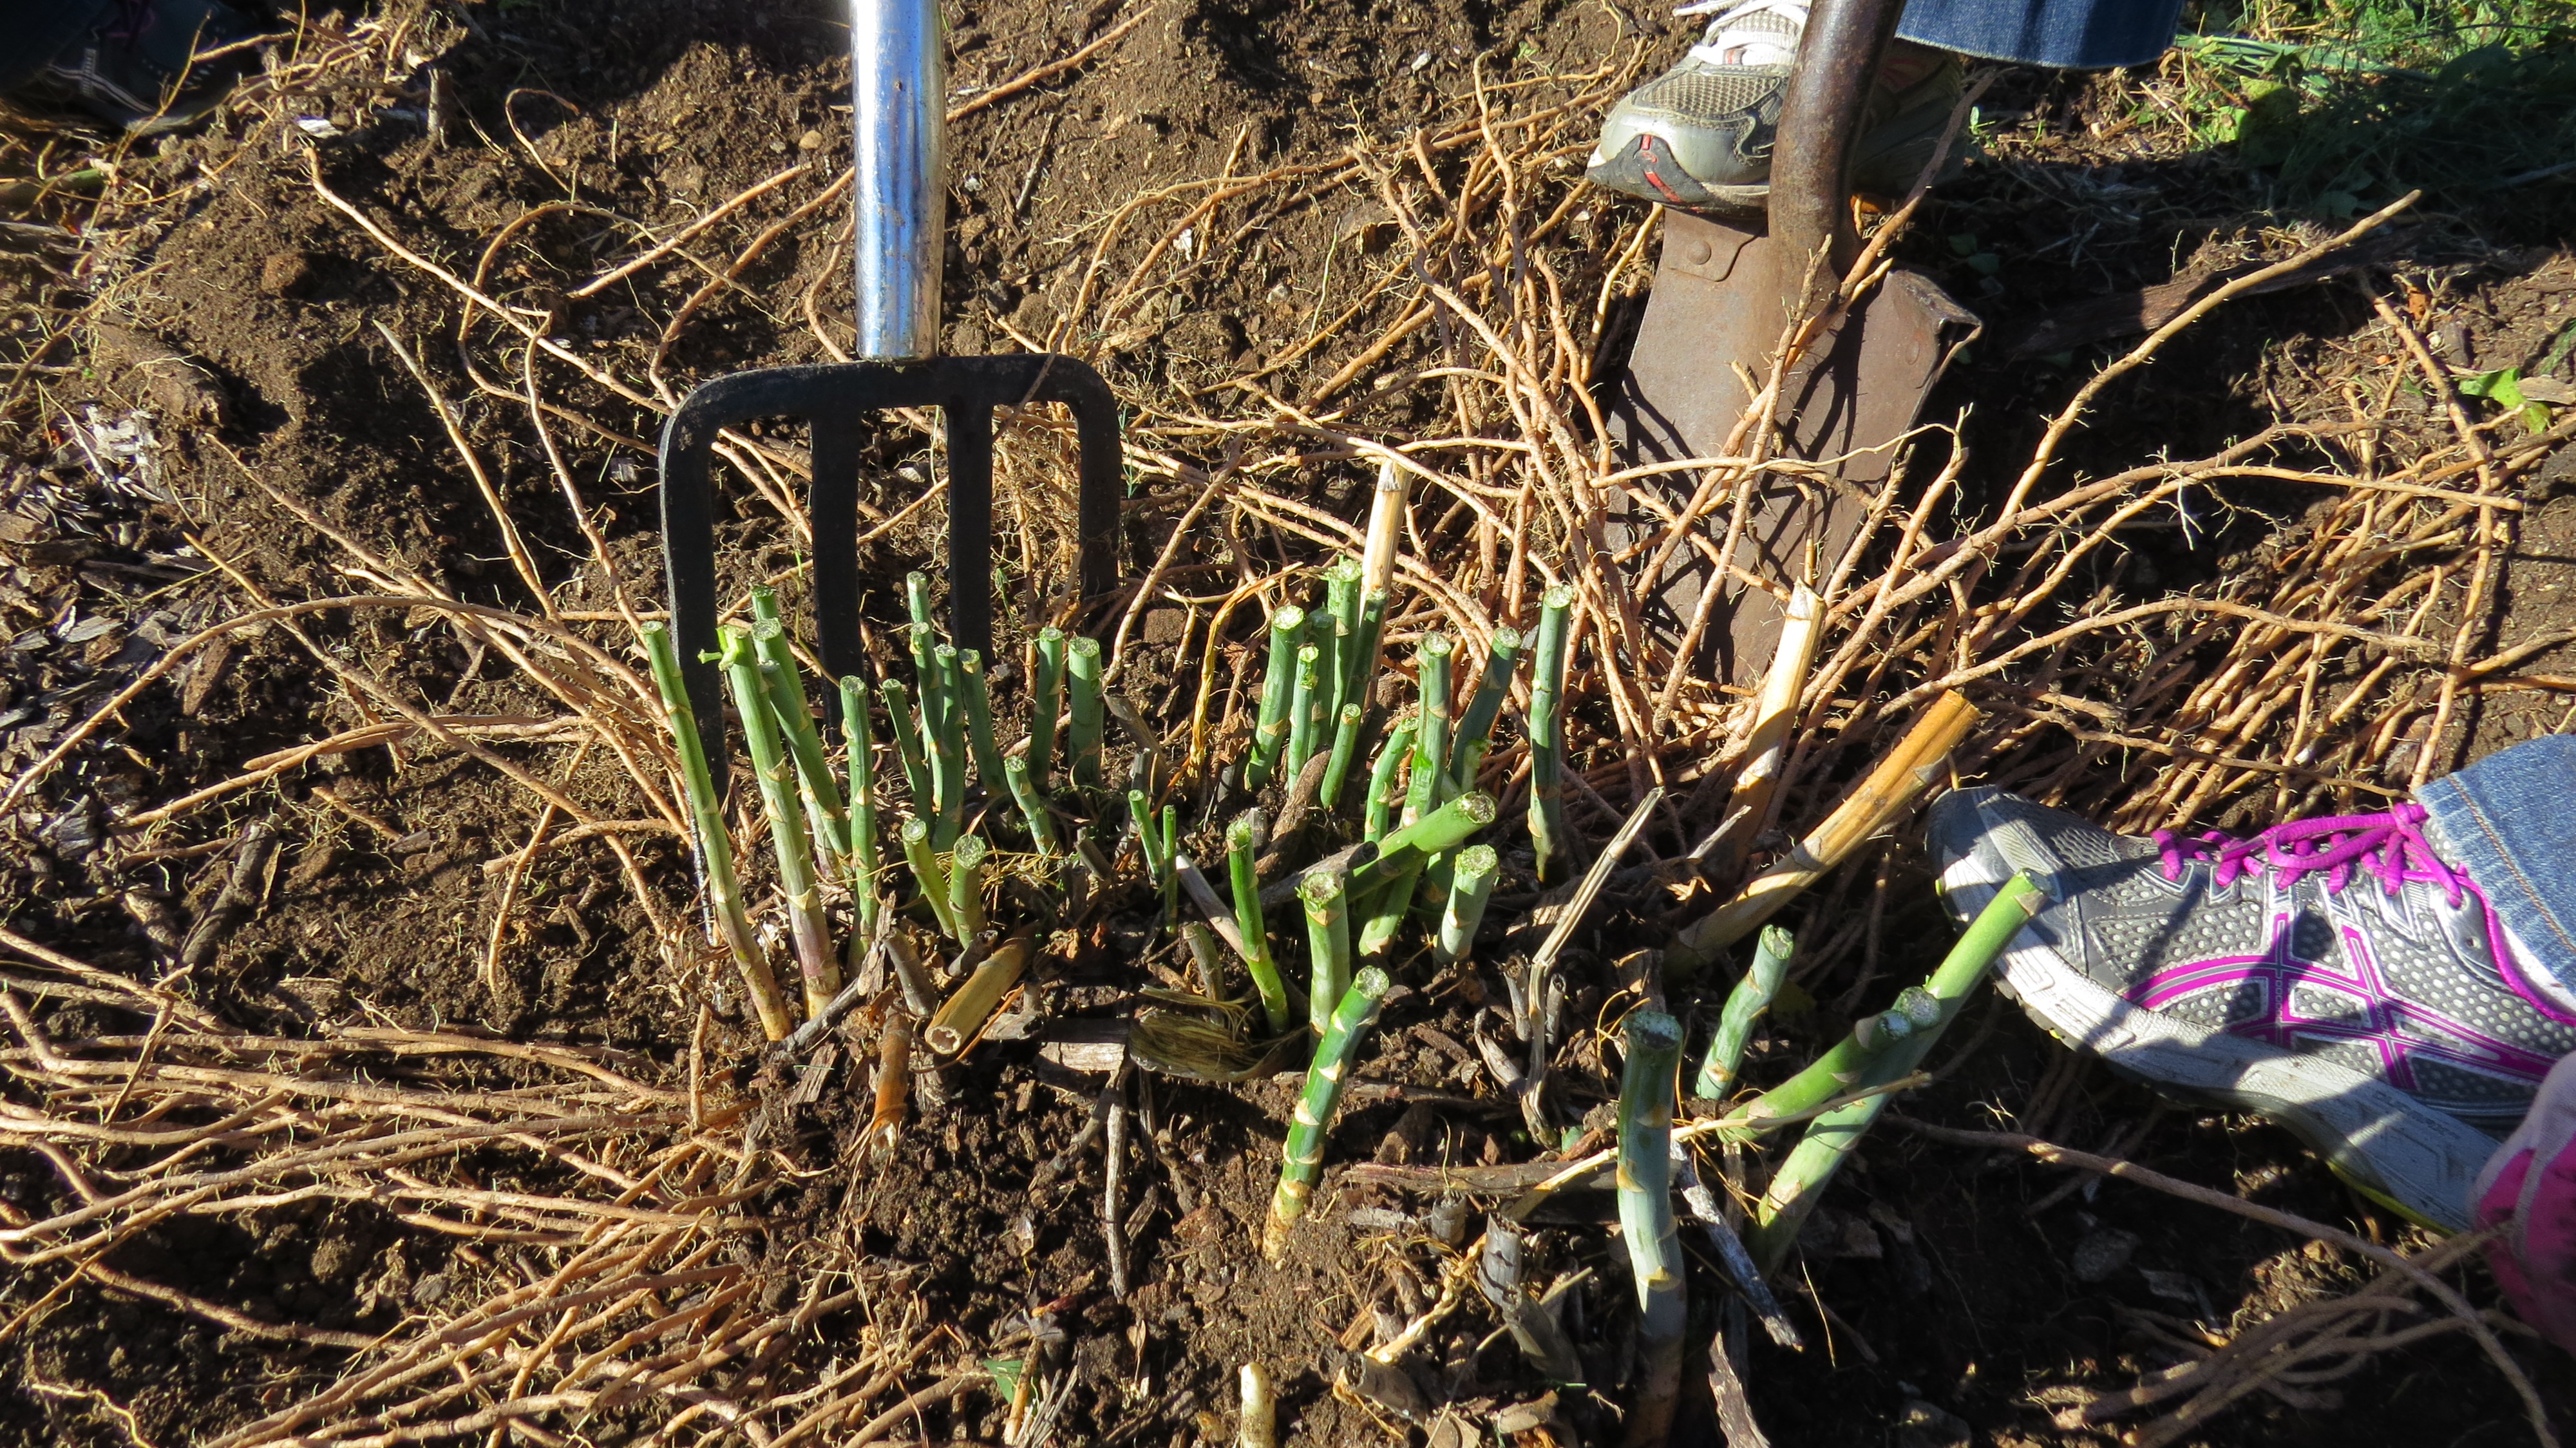
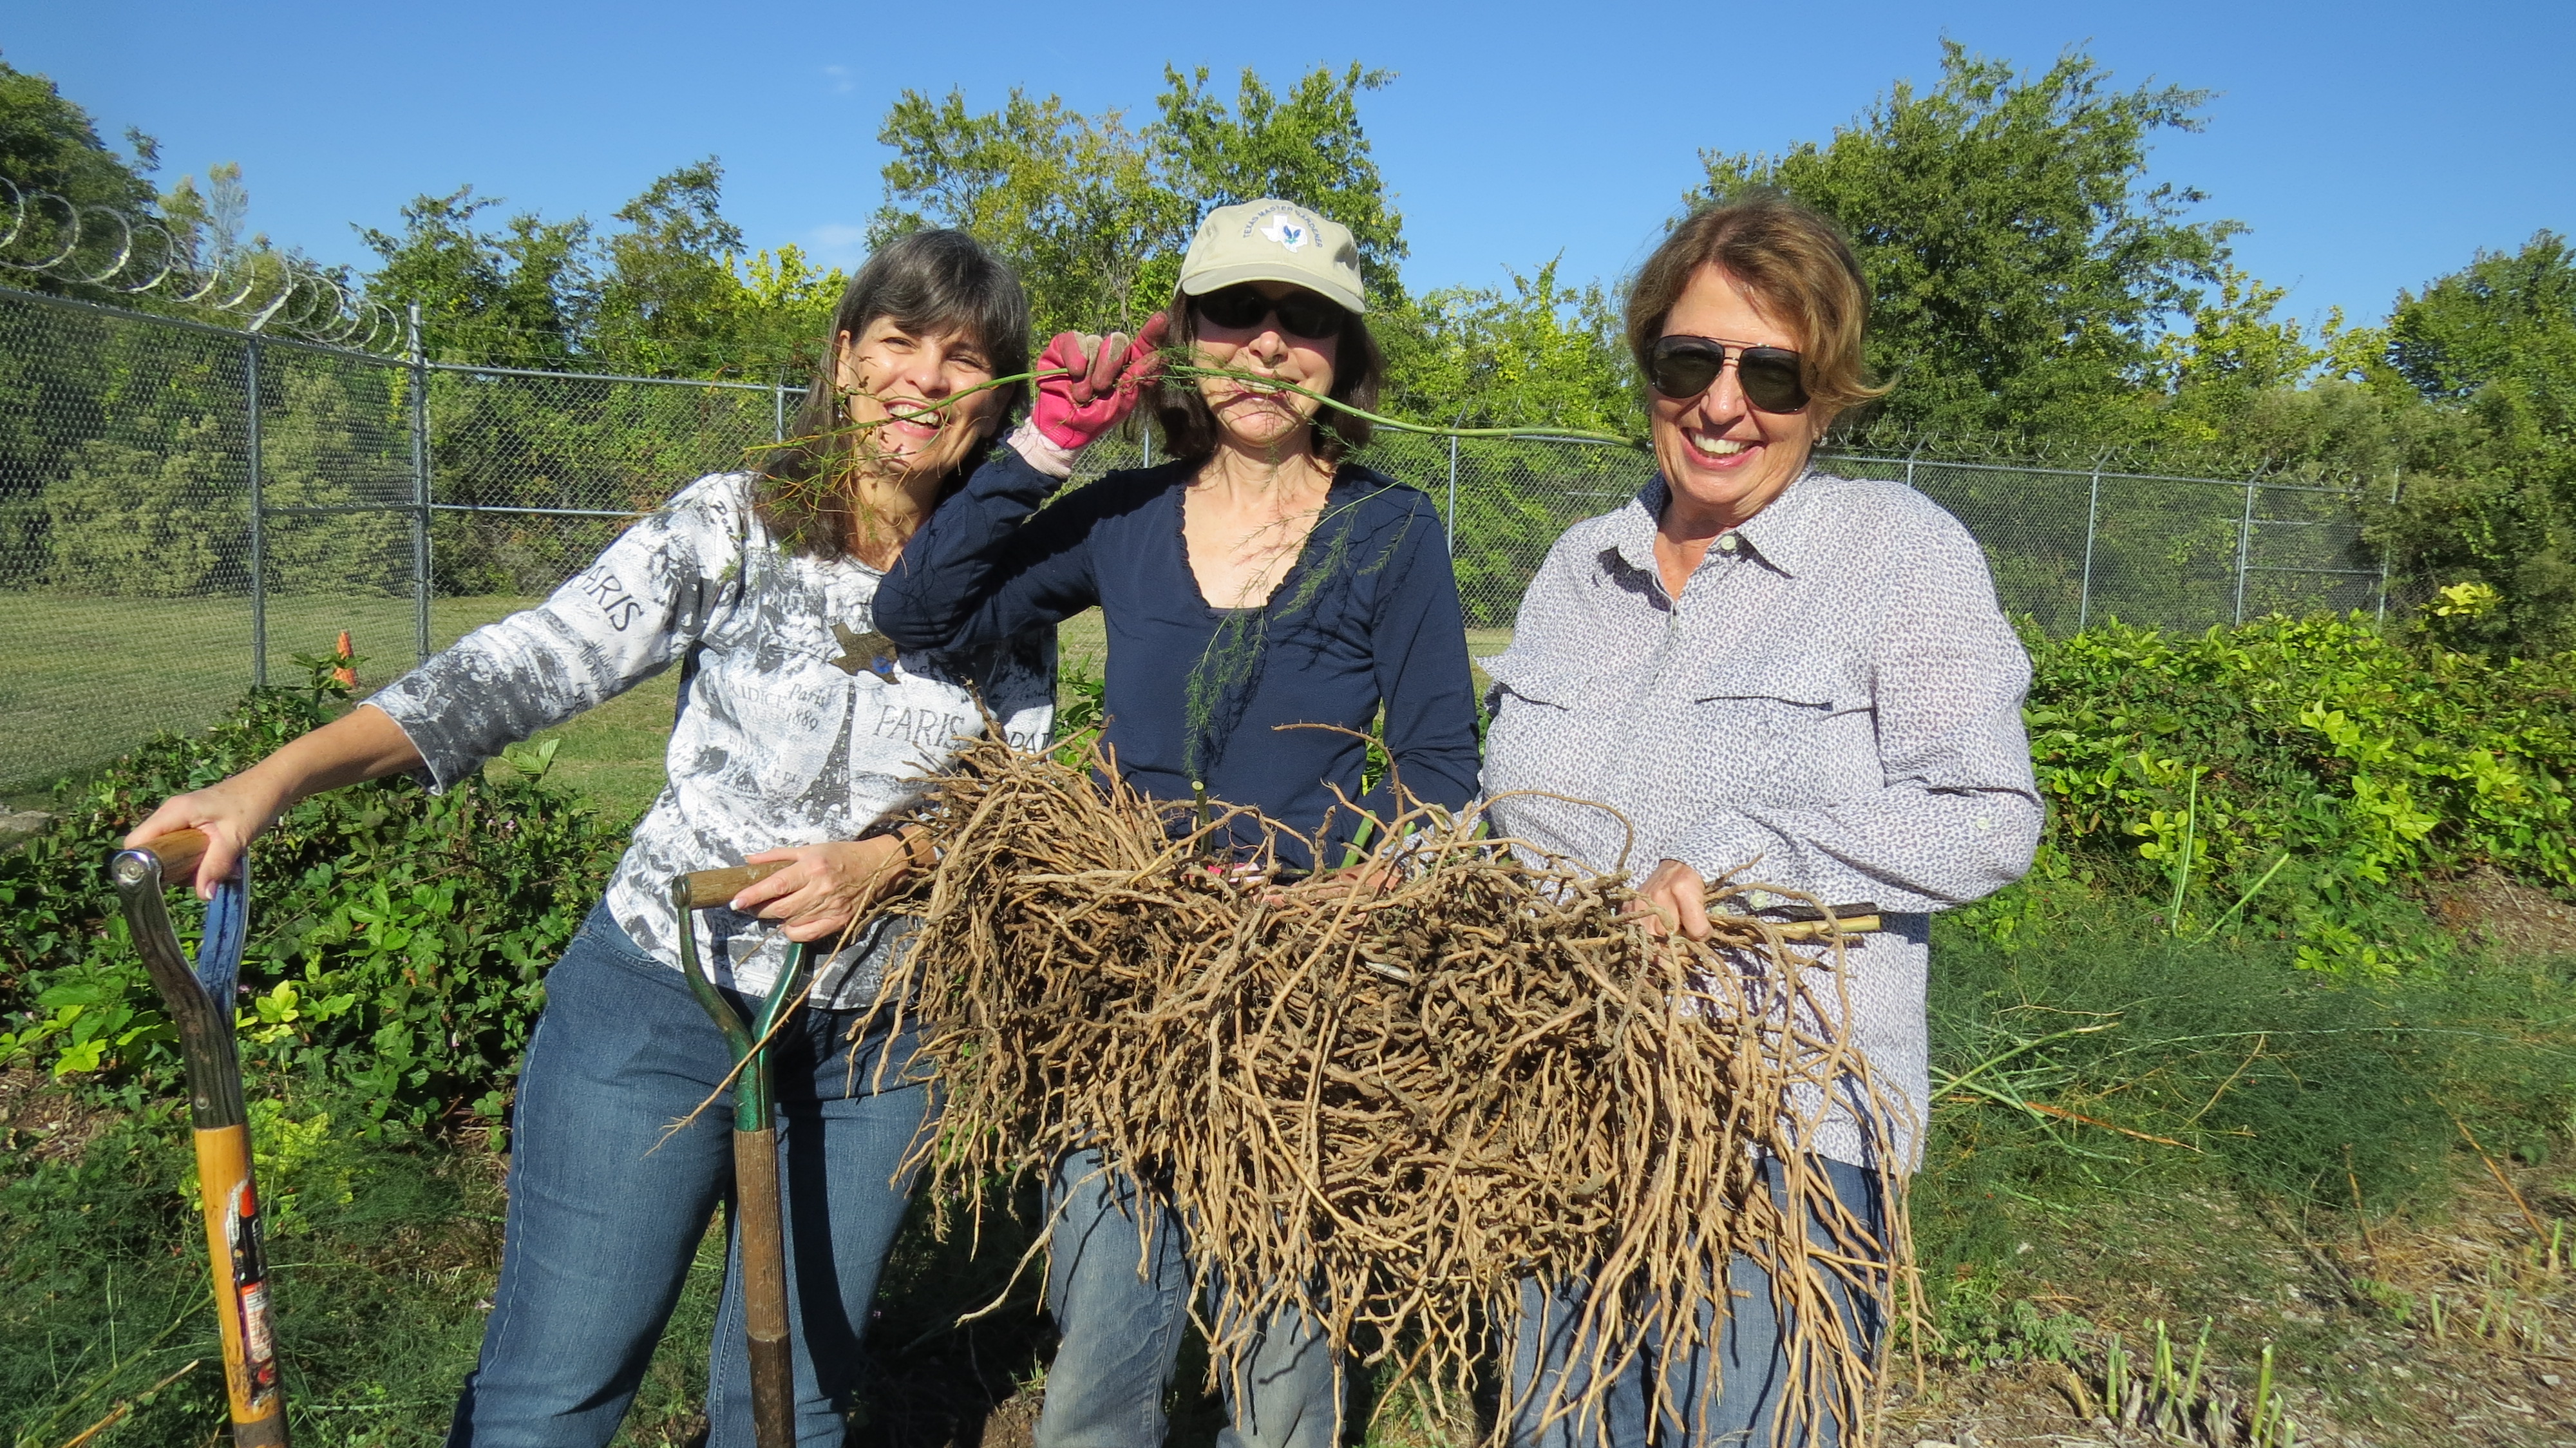
Place crowns 12 to 14 inches apart. Planting too closely can cause small spears. Wider planting results in larger spears but lower total yield. Control weeds but do not injure the crowns. Fill the furrows gradually as the shoots grow. This covers small weeds, and they die from lack of light. By the end of the first season, the furrow reaches its normal level (figure 1). Deep planting of the crowns allows cultivation with garden tools or tiller (do not till too deep) without damage to crowns. 

Watering 

Asparagus plants like frequent, deep watering. Water the beds thoroughly as needed. Allow the top 1 inch of soil to dry before watering again. The time varies from 3 to 5 days depending on temperature. Asparagus roots reach 10 feet deep if the soil is adequate and moisture is available. 

Care During the Season 

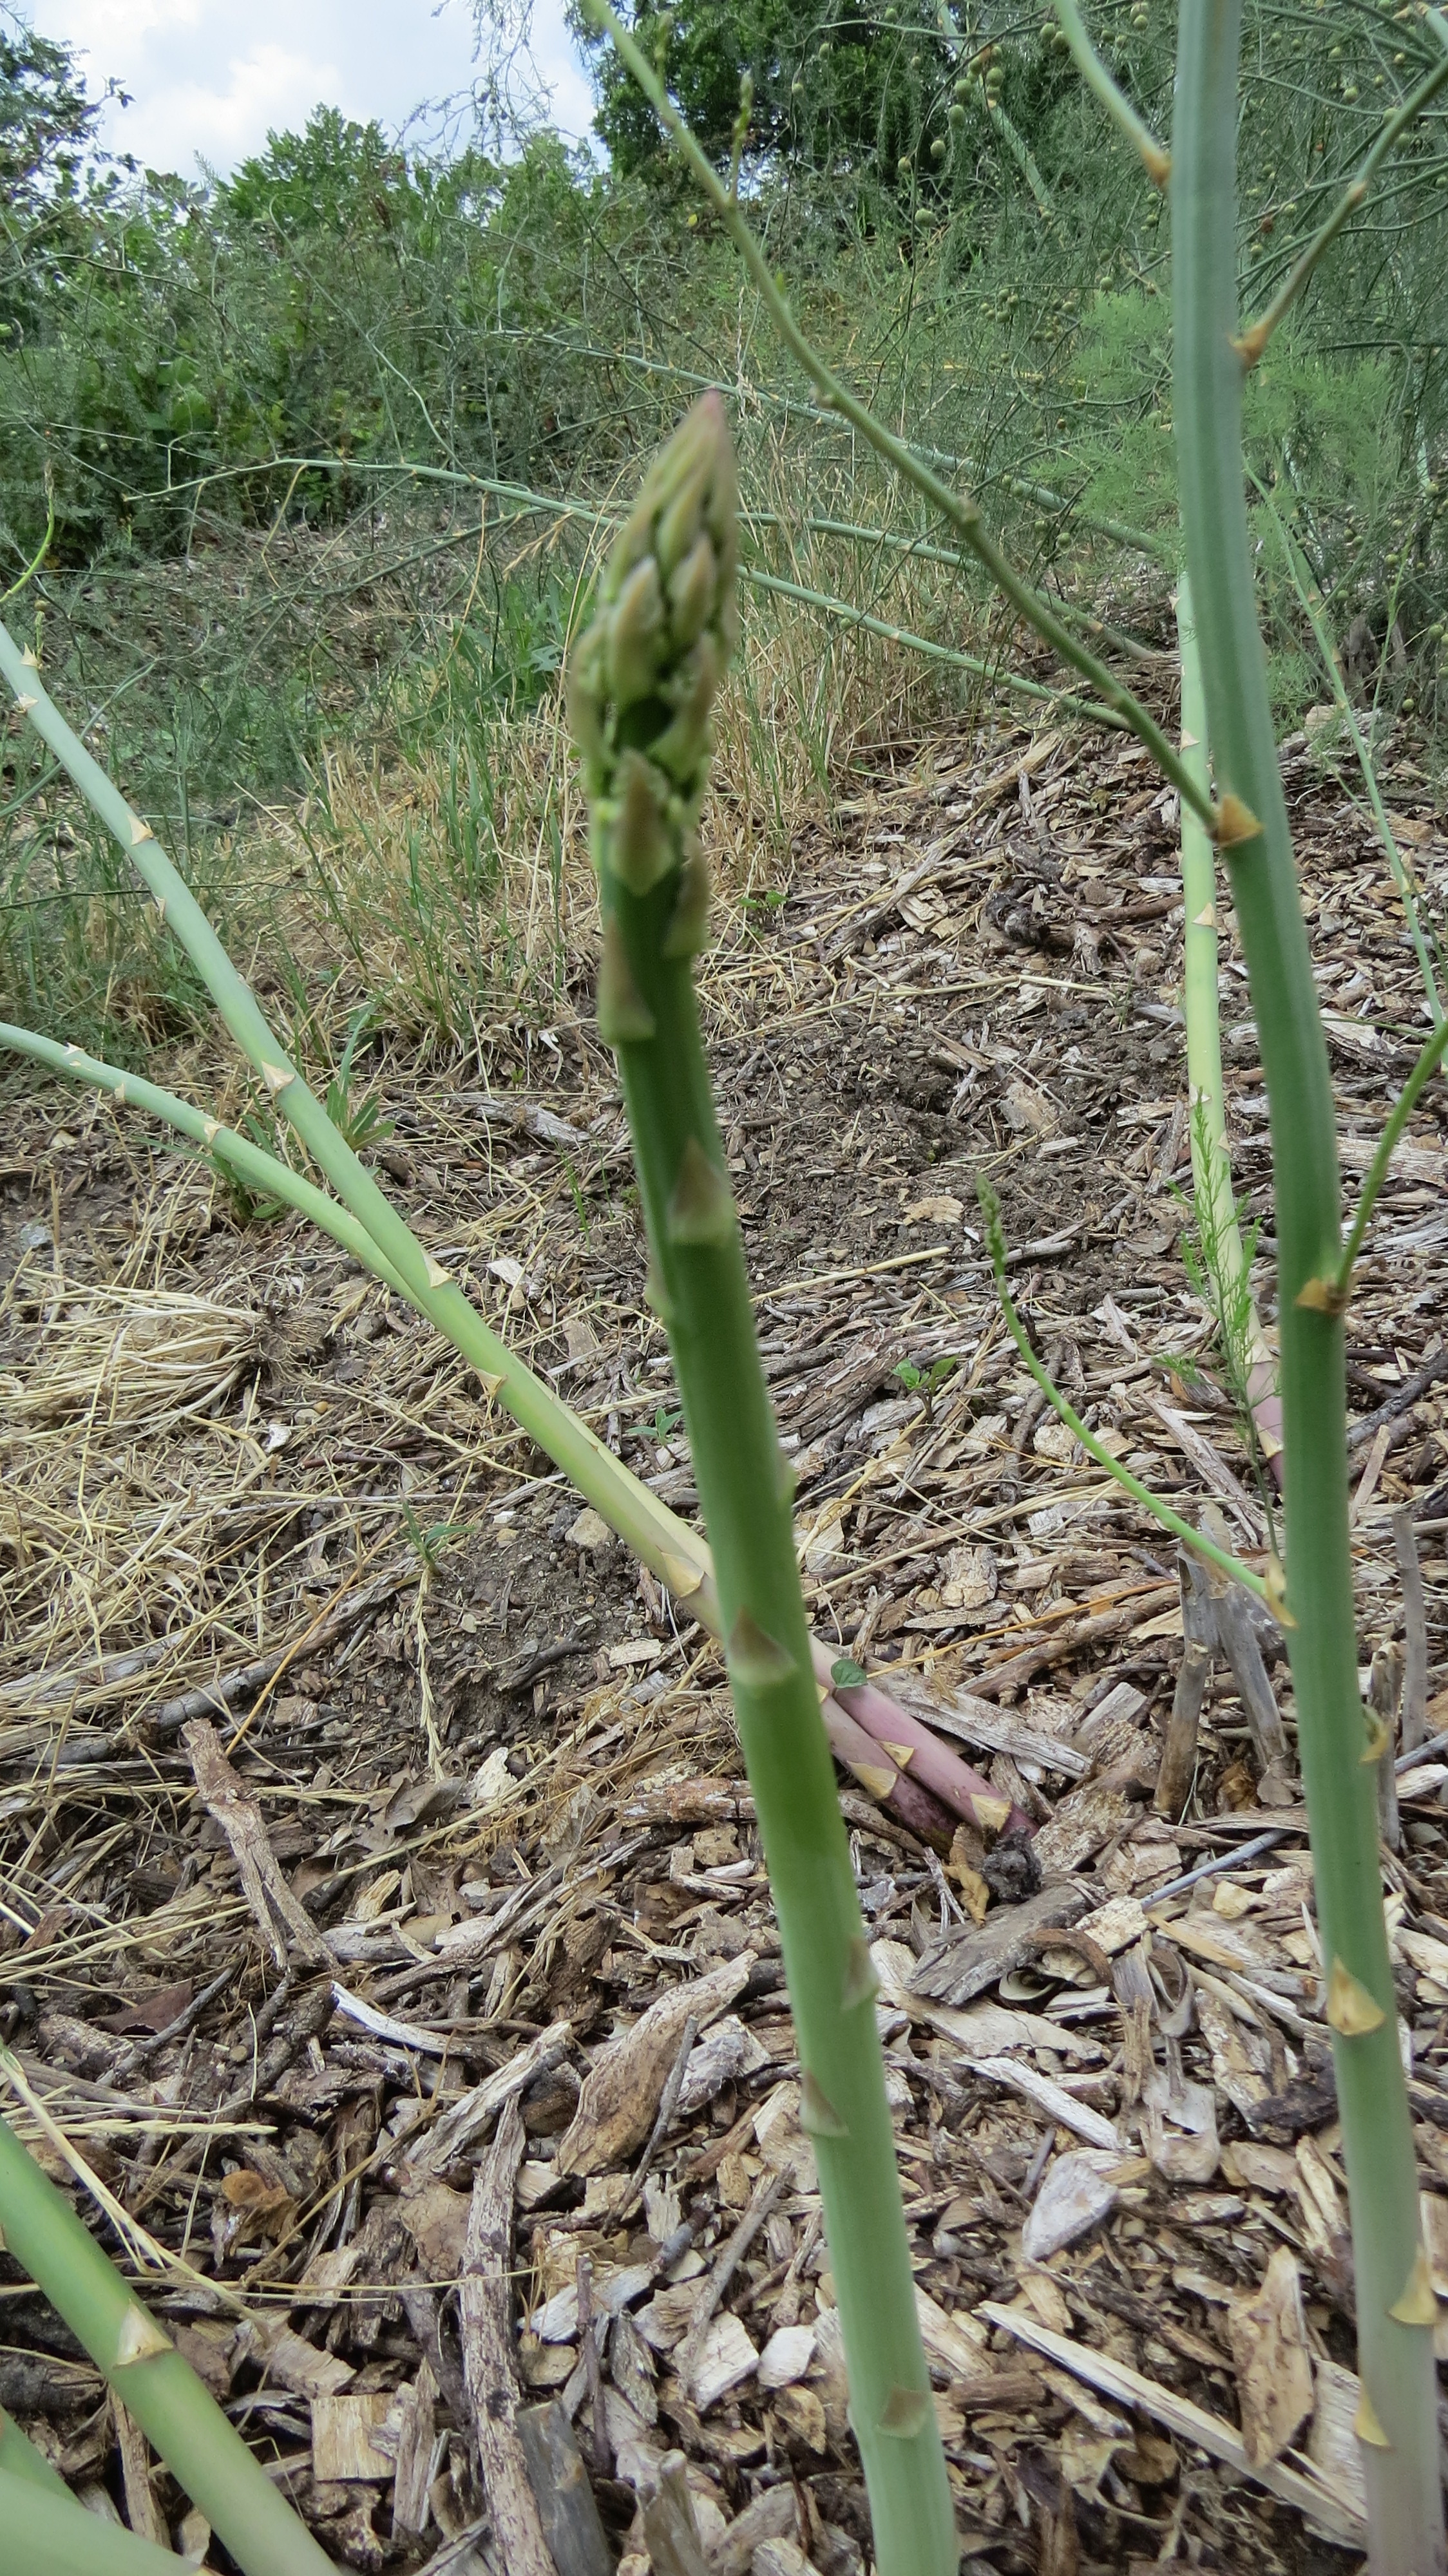
Keep weeds pulled or hoed from the beds. Asparagus beds require little care after the first 2 years. Control weeds without damaging the spears. In early season, till the soil when fertilizer is applied before the spears begin growth (figure 2). Control weeds during the season by raking lightly or mulching. After the last harvest, cut back all top growth. Apply fertilizer and till lightly 1 to 2 inches to kill weeds. 

Cover the bed with a 3-inch layer of clean straw, compost or other mulch material, water thoroughly and allow to grow the rest of the year. This helps insure a good harvest the next year (figure 3). 

After the first hard frost/freeze of fall, cut fern tops off at ground level and mulch with manure. In southern areas the fern may not be killed by a freeze and should be removed in late November. Any spears which sprout may be removed and eaten. 

Harvesting 

Harvest asparagus spears from established beds for about 8 weeks. Do not harvest too soon from a new planting. 

Harvest spears when they are 4 to 10 inches long. To prevent spears from becoming fibrous, harvest at least every other day. The fibrous condition is caused by overmaturity or inadequate fertility. Spears with loosely formed heads are overmature. 

Cut asparagus spears 1 to 2 inches below the soil level. At least one-half the length of the spear should be above the ground. Never cut the spear within 2 inches of the crown to avoid damage to the developed buds. Never cut asparagus spears above the ground and allow stubs to remain (figure 4). Discontinue harvest when spear diameter becomes less than 3/8 of an inch. 

Reprinted courtesy of Texas AgriLife Extension Service.

Moving Asparagus

If your house caught on fire, you might have thought about which prized possessions you would grab on your way out. What would it be: a photo album, childhood memoir, or book?

What if you had to leave your 9 year old garden in a rush?  We had to do that very thing.

For sure our asparagus plants needed to be moved to our new location. Two or three years ago we had planted two packages of scrawny looking asparagus crowns in a trench.  They looked dead and we didn’t think they would come up, but in a miraculous way they thrived!

Now we had to hurry to bring these very same asparagus plants to our new garden. Hastily the digging began!

 Asparagus Roots

Asparagus Roots

The roots had grown to gargantuan proportions. Even that didn’t stop us and we got a little silly about it!

Kim, Sue, Ann, and our Saved Asparagus Roots

Kim, Sue, Ann, and our Saved Asparagus Roots

We picture our asparagus flourishing in our new garden at Midway Hills as a sort of Asparagus Lane at the entrance to our new vegetable garden. And why not; asparagus is a perennial vegetable and really pretty throughout the year except after the first freeze when you cut it back.

There’s nothing finer than Asparagus from your very own garden.

Close up of Asparagus Shoots

Close up of Asparagus Shoots

So, dear friends, we will be talking hopefully about fresh asparagus this spring.

I am just glad we got ours out in time!

Ann

Pictures by Starla and Kim

More notes on Asparagus tomorrow.