It’s that time of year again when it is too hot to do anything, much less garden in the full sun. Cool weather crops of greens, lettuce, cilantro, and others have either withered away in the heat or gone to seed. Even tomatoes, as the temperature climbs up into the high nineties, are beginning to get stressed. Somehow, at this time of year, purchasing bags of pre-cut and washed lettuce and spinach at the grocery store doesn’t seem so bad. Yet there are some green leafy vegetables that not only like the heat but thrive in it.
Malabar Spinach (Basella albra and Basella rubra) is an edible vine in the family Basellaceae. It features dark green, glossy, thick leaves. In its native habitat of the Indian Subcontinent, New Guinea, and Southeast Asia it is a perennial plant. Here in Dallas it dies in the winter but will often come up readily (occasionally too readily) from seed as the weather warms up in the spring. It goes by several common names such as vine spinach, Ceylon spinach, and climbing spinach among others. From its name you can see that it needs something to twine around. Even an upside down large tomato cage will work, though a large trellis is better because the vines grow quickly and need to be constantly “put in their place.”

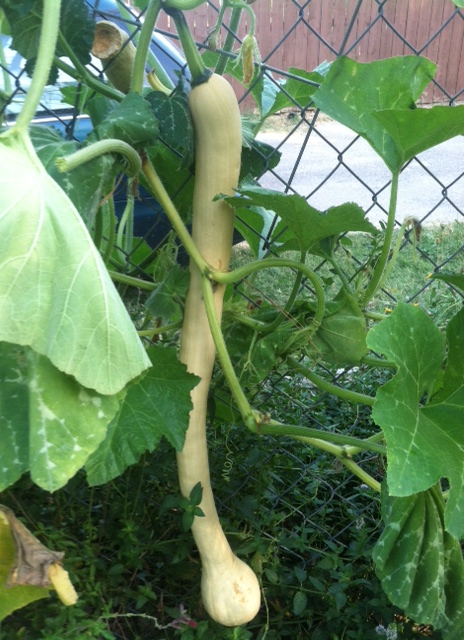
Malabar Spinach at Hope Community Garden
There are two varieties of Malabar Spinach. B. alba has green stems and B. rubra has red stems and is quite ornamental. Though both are called “spinach,” they are only distantly related to spinach and have an entirely different texture and taste. In general, only the leaves are eaten, though in Africa the stems are cooked too. Younger leaves have a very mild taste, though larger leaves, especially if not watered well, can have a peppery, astringent flavor. When harvesting, it is recommended that about every other one of the small to middle sized, younger leaves be picked.
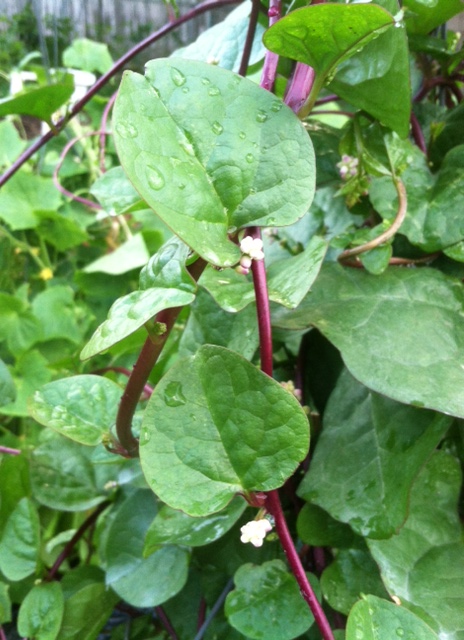
Malabar Spinach,Basella rubra
Malabar Spinach, like okra, is known as a “slippery vegetable” and some people find the mucilaginous texture of the succulent leaves takes some getting used to. However, Malabar Spinach is high in Vitamin A and C, iron, and calcium. It is also high in protein per volume and is a good source of soluble fiber. It holds up particularly well in stir fries, egg dishes and curries. Many recipes can be found on the internet for ethnic dishes using Malabar Spinach. It is also good raw mixed with lettuce and other vegetables for a nutritious summer salad.
Growing Malabar Spinach is easy—just wait until the ground temperature is 65-70 degrees (like okra) since the plant thrives in hot and humid temperatures. White flowers produce black seeds that will often readily reseed themselves. Some internet sites recommend scarifying the seeds to help with germination or soaking them but often this is not necessary if the soil is kept moist.
Humans are not the only “animals” that enjoy Malabar Spinach. Dallas County Master Gardeners who volunteer at the Dallas Zoo have helped grow Malabar Spinach in the past for the Zoo’s animals. Aaron R. Bussell, Animal Nutrition Supervisor at the zoo, says this about the role of Malabar Spinach at the Zoo :
“We had a great crop of Malabar Spinach last summer from the Green Life Education Garden, and it lasted into winter. It was a great source of “Novel” greens for our primates that can get bored eating the same greens on the market. Novel foods are rotated into the diets to provide nutrition and enrichment. The diets we produce at the Animal Nutrition Center for over 2000 animals every day are tailor made for 400 plus species at the Dallas Zoo. We substituted the Malabar Spinach into our Mixed Greens Salad which is shredded for birds, mammals, and reptiles throughout the zoo, and our full time Nutritionist evaluated it as an appropriate substitute for spinach or greens for our primates like chimpanzees, gorillas, and monkeys. Having more variety of greens to offer these sometimes picky eaters is a great way to provide enrichment for their daily routine. Malabar Spinach was grown not only for its nutritional value, but it provided natural stimulation when our Western Lowland Gorillas striped the leaves from the vine when served. It continued to grow much further into the fall and winter as well. We ended up serving the last of the harvest still entwined onto the bamboo trellis it was grown on. Great vegetable. We look forward to growing more again.”
So…. if you want to grow a spinach substitute and a plant favored by both man and beast, try growing Malabar Spinach. You may discover you like it.
Carolyn