Ladybug, Ladybug

Seed catalogs are filling our mailboxes and  thoughts begin to yearn for spring.   A little information about ladybugs may help you  forget these cold, gloomy winter days:

Certainly one of the most beloved of all insects is the ladybug, or more correctly, lady beetle.  And a new citizen science web project may be just the thing for adults and kids with an interest in lady beetles or cameras or both. The Lost Ladybug project started because of concerns about dwindling Ladybug _sm
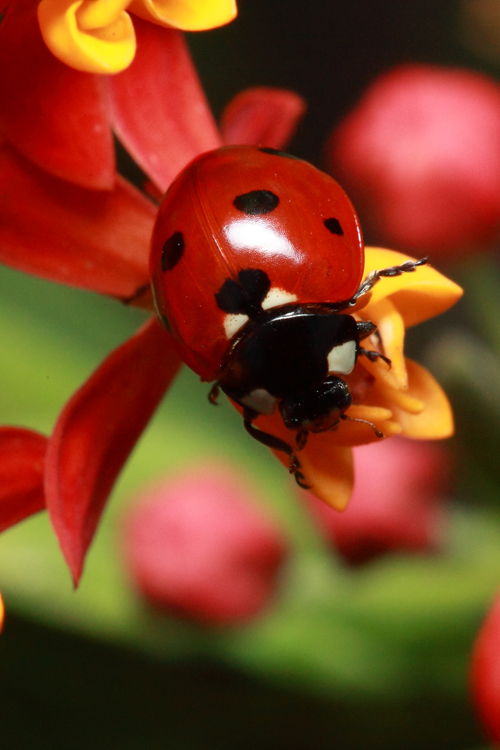
numbers of one kind of lady beetle, the nine-spotted lady beetle, in New York state.  It appears to have evolved into a bigger project where people from any part of the country can participate.  Find a lady beetle?

Photograph it and document the site, time and date of picture.  Then upload the information and contribute to science! What a great way to have fun and do something worthwhile.  In addition to recording your observation, visitors can view and print posters of different kinds of lady beetles, read interesting lady beetle facts and (teachers) can download lady beetle lesson plans.  Scientists will benefit from the photographic record, which should allow more up-to-date range records for common and rare species.

Perhaps most important, over time the project may allow scientists to document changes in range or distribution or abundance of different species.  The scientists are especially interested in rare lady beetles in out of the way locations, like state parks or little trodden trails.  But any site will do.  The thing is, you never know what’s going to happen when thousands of people are looking and clicking.

For anyone who thought a lady beetle is just a lady beetle, think again.  There are over 450 different species of lady beetles in North America, over 5,000 worldwide.  They come in all sizes and color patterns, feeding mostly on aphids and scale insects–two important pests for farmers and gardeners. Lady beetles are true beetles in the Order Coleoptera, not “bugs” in the Order Hemiptera.  Beetles have chewing mouth parts, go through a complete metamorphosis, and have the first pair of wings hardened to protect the body and the hind wings.  Bugs have sucking mouth parts, go through gradual metamorphosis, and have the first pair of wing partly hard and part transparent.

Nevertheless, despite the science, the name ladybug is likely to persist.  After all, Lady beetle, Lady beetle… Fly away home! …it just doesn’t have the same ring.

Photo and Writing by Mike Merchant, first printed on the blog Insects in the City.

If you are interested in learning more about insects and receiving occasional articles from Dr. Merchant on the latest insect pest or interesting insect facts  sign up for his blog, Insects in the City.  He is as good a writer as he is an entomology teacher.

Carolyn

Merry Christmas To You!

Christmas 2013 Garden

MERRY CHRISTMAS FROM OUR GARDEN TO YOURS!

Picture by Starla

Icemeggdon

Above:Crepe Myrtle Tree Ensconced in Ice

Above:Crepe Myrtle Tree Ensconced in Ice

Ice hit  North Texas hard this weekend.  Some of the effects were pretty, some were not.

Above: Broken Tree Limbs, Ice Storm Damage

Above: Broken Tree Limbs, Ice Storm Damage

We asked our fellow Master Gardener, Eric,  for advice. Driving around seeing tree limbs down all over the city is distressing. Although we can’t save every tree from ice damage, we can head off some of the damage by heeding Eric’s words:

The main damage trees sustain during ice storms are limbs that break due to the excess weight from the ice that collects on the end of the tree limbs. This is usually due to improper pruning techniques that strip all the foliage away from the limbs except for a “Lions Tail” on the very end of the limb. The ice collects on the end of the branch thus creating a very strong downward vertical cantilever force. The longer the limb, the greater chance for failure.

Having a certified Arborist prune your trees will not guarantee your trees will never suffer broken limbs during an ice storm but you will suffer far fewer broken limbs than your neighbors who hire the drive by “tree toppers”. Proper “pre-storm” tree maintenance is the key to less damage for your trees.

If your trees do suffer ice damage, be sure to contact a professional tree care company to properly access the damage and suggest the best method of treatment.

Eric

Pictures by Starla

Fall Clean Up in Your Wildlife Garden-Don’t!

There’s a discussion going on in our garden.  How tidy do we want to be?Should we dead head and prune all our perennials and rake our leaves ? Maybe not, our fine feathered friends are looking for food all winter.

“If you’re not careful, you can yank the welcome mat right outfrom under all the birds, insects and small mammals your garden has been home to throughout the rest of the year.”

Debbie Roberts, Fall Clean Up in the Wildlife Garden.

Above: A view into our Wildlife Garden looking through PInk Muhly Grass. Grasses provide cover for wildlife and their seed heads provide food.

Above: A view into our Wildlife Garden looking through Pink Muhly Grass.
Grasses provide cover for wildlife and their seed heads provide food.

Less work? I am all for it. Look at some of the blog titles written on this subject:  Drop Your Rake and Look to the Skies and Fall Wildlife Garden Chores.

Above: Seedheads will be left unpruned to provide  winter food in our garden for wildlife.

Above:  Rudbeckia Seedheads

Looking for other ways to accomodate wildlife in your garden? Birds feast on Berries like Beauty Berry and Yaupon Holly in winter months.

A View of our Wildlife Habitat at The Demonstration Garden, looking North.

Yaupon Holly berries on the right, maize on the left under a bird feeder

So less work equals a more friendly wildlife garden; we can handle that!

Ann

Pictures by Starla and Ann

Volunteering at The Demonstration Garden on Joe Field Rd.

The Class of 2013, as preceding classes have, was offered the opportunity to taste volunteering at a variety of sites during the Jump Start portion of our training.  With great trepidation and much innocence, I purchase some pruning tools to begin my adventure in publicly putting class learning into action.

So, one morning as scheduled, I got into my car and drove to the Joe Field Demonstration Garden.

Demo Garden Fall 2013

It was not difficult to locate the gardens on a map or to navigate the streets.  When I got out of the car, I was greeted and welcomed by several experienced Master Gardeners who were very attached to the site and glad to see me.  Is attached the correct word?  Devoted to?  Enamored by?  In love with?  I have discovered that the passion exhibited by those involved with the various sites is communicated with relish and joy.  This was easily seen and felt as the Joe Field ladies divided me and my classmates into groups and took us on a tour of the variety of areas before assigning us tasks to perform.

Was I interested in composting?  Did I want to learn about drip irrigation?  How about pruning?  (Anyone know the difference between pruning and shearing?  I can now tell you what the difference is.)  Mulching?  Transplanting?  Sun plants?  Shade plants?  Vegetables?  Raised beds?  The color wheel was amazing as were the roses.  Truthfully, roses usually don’t do anything for me but even I was impressed with the variety, vibrancy, and size of the rose bushes.  (Many of the bushes were the size of some trees I’ve seen.  I’ve got two scrawny rose bushes in my front yard that haven’t grown much in three years so how did Joe Field do this magic with theirs?)

I recognized plants that live in my own garden but darned if I could name them.  Voila!  The Master Gardener leading my small group easily gave me the name of those plants and told me about their needs.  I kept asking, “How’d she know that?  How can she keep all this knowledge in her head and come up with it on a moment’s notice?” I wonder if I will ever be that familiar with plants.

I was very aware of the phenomenal use of space.  The areas were not particularly overplanted but were, nevertheless, packed with plants and more plants and provided inspiration and ideas to take home to my own garden and beds.

There is so much going on in terms of what is growing that it is impossible to take it in with just one visit.  Maybe that is a lure—come back and learn some more.  Not a bad idea.  Between that chance to learn (and to serve) and the camaraderie of the seasoned volunteers, Joe Field Demonstration Gardens is a smart and happy choice for Master Gardeners.  I’m glad I can visit and revisit this rich site.  Tuesdays are the targeted day of the week for volunteering just in case you want to try it out.  Maybe we will see each other and learn together.

Zelene

Picture by Starla

Map to our gardens here.

Green Tomato Primer

Green tomatoes are usually seen at the beginning and the end of tomato season.  Sometimes they get harvested at the beginning when you just can’t wait another minute to have a tomato, and when the weatherman announces the first frost of the year, the rest of the harvest comes inside in a hurry.

If it’s been a good year, that leaves you with lots of tart green balls; some may continue to ripen, but they usually don’t have the depth of flavor and sweetness of those that finish on the vine.  But it’s a pity to compost all that hard work and potential goodness.  So what do you do?

Above: 13 cups of green tomatoes were harvested  for Green Tomato Recipes. The ripe tomatoes were eaten.

Above: 13 cups of green tomatoes were harvested for Green Tomato Recipes. The ripe tomatoes were eaten.

This primer will hopefully help you better understand your green harvest and give you some ideas – along with some recipes – to help you use it all up deliciously! Green tomatoes are tart and hard.  If you have green cherry tomatoes, you may even find them a little bitter (I think that’s from the greater amount of skin to pulp than you have on a larger tomato.)  To mellow the flavor of the tomato, you could cut, dice or slice it (you want to expose the interior), salt it, cover it and let it sit overnight in the refrigerator.  The next day (or the day after that) when you go to use it, drain and rinse it, and it will still be tart, but it won’t turn your face inside out. Green tomatoes can be substituted reasonably easily in recipes that call for:

  • tart apple
  • lemon
  • kumquat
  • tamarind
  • fresh cranberries

Cherry green tomatoes would work especially well as substitutes for kumquats and cranberries if the shape is important.  So if you already have a recipe you enjoy that uses one of these ingredients, go ahead and substitute green tomatoes for it! Below is a list of flavors that would complement green tomatoes, if you enjoy improvising:

  • almonds
  • walnuts
  • hazelnut
  • coconut
  • coconut cream
  • sesame oil
  • balsamic vinegar
  • tea
  • vanilla
  • rose water
  • ginger
  • sugar (brown, white)
  • thyme
  • rosemary
  • coriander
  • allspice
  • cardamom
  • cloves
  • cinnamon
  • nutmeg
  • mustard
  • caraway
  • bay leaf
  • chile pepper
  • garlic
  • onion
  • bitter greens
  • corn
  • butter
  • cheese (ricotta, parmesean, cream)
  • chicken
  • turkey
  • duck
  • beef
  • game (venison)

A flavor combination:

  • beef + coconut milk + green tomato 

Other recipe ideas:

  • cornbread with green tomatoes and jalapenos
  • almond thumbprint cookies with candied green tomatoes (or green tomato jam)
  • coconut pie/tart crust with a green tomato filling
  • green tomato jam and coconut milk in your favorite vanilla ice cream recipe (substitute the coconut milk for some or all of the milk and cream)
  • dehydrate and powder the tomatoes to add to any recipe for a little extra tartness
  • added to soups or stews
  • the classic: fried green tomatoes! 

The following recipes were designed for a small batch of green cherry tomatoes, where 1 cup weighed approximately 5 ounces.

Above: Green Tomato Recipe Sampling at The Demonstration Garden

Above: Green Tomato Recipe Sampling at The Demonstration Garden

If your tomatoes are full-sized, you may choose to dice or slice them, and in addition, you have the option of peeling the skins to reduce the acidity, and some of the bitterness.

Hungry for Lila  Rose’s Green Tomato Recipes? Click Here.

Lila Rose

Pictures by Starla

Basil Harvest

Today at the garden we harvested buckets full of sweet basil.  With winter’s chill at our doorstep it’s the perfect time to fill our freezers with basil pesto. Basil Harvest

 Here is  Classic Pesto hidden in our Tomato Tart Recipe!

Basil ready for the freezer

Before bedtime and  the freeze tomorrow, review

 Basic Facts About Basil Here!

Sweet Dreams, I will be dreaming about basil and hope you will, too!

Linda

Layered Pumpkin Pie in a Jar

imageLayered Pumpkin Pie in a Jar

Ingredients:

For the graham cracker crust layer:

1 ½ cups graham cracker crumbs

3 tablespoons brown sugar

½ teaspoon cinnamon

½ teaspoon salt

4 tablespoons unsalted butter, melted and slightly cooled

For the whippy cream cheese layer and finishing dollop of sweetened whipped cream:

2 cups heavy whipping cream

1 ½ cups sifted powdered sugar

8 ounces cream cheese, at room temperature

2 teaspoons pure vanilla extract

For the pumpkin layer:

1 cup milk

1 (15-ounce) can pumpkin puree (not pre-spiced pumpkin pie filling)

2 packages (4-serving size) Jell-O vanilla flavor instant pudding and pie filling

1 ½ teaspoons cinnamon

¼ teaspoon ginger

1/8 teaspoon cloves

Optional:  semi-sweet chocolate shavings to sprinkle over the top image Directions:

1. Preheat oven to 350 degrees.  Place the mixing bowl and beaters for beating the cream into the freezer to chill.

For the graham cracker crust layer:

1. Stir together the graham cracker crumbs, sugar, cinnamon, and salt.  Then add the melted butter and stir until evenly moistened.  Spread mixture in a 9” x 13” pan and bake for 5 minutes.  Stir and bake for another minute or two, or until crumbs are fragrant and nicely browned.  Be careful not to burn.  Remove from oven and let cool completely while you prepare the other pie layers.

For the whippy cream cheese layer and finishing dollop of sweetened cream: 1. Using your chilled bowl and beater, whip the cream until stiff.  Add the powdered sugar and beat just to combine.  Remove sweetened whipped cream to another bowl and set it in the refrigerator.  Add the cream cheese to the same chilled bowl and cream until very smooth, about 1 to 2 minutes.  Blend in vanilla.  Now add half of the sweetened whipped cream back into the chilled bowl with the cream cheese, gently folding to thoroughly combine.  Place the bowl of whippy cream cheese and the remaining half of the sweetened whipped cream back into the refrigerator to stay chilled.

For the pumpkin layer:

1. Pour the milk into a large bowl.  Add the pumpkin, pudding mixes, and spices.  Beat with a wire whisk for 2 minutes, or until very well blended.  The mixture should be quite thick.

2. Fill a pastry bag fitted with a large plain round tip (ex. Ateco No. 808) with the whippy cream cheese mixture.  Pipe a layer of this mixture onto the bottom of a jar, starting at the perimeter of the jar and working to the center.  Lightly tap the jar on a towel (so jar doesn’t break) on the counter, to settle the mixture in.  Repeat this step with the rest of the jars.

3. Sprinkle the whippy cream cheese layer with 2 tablespoons of baked graham cracker crumbs.  Lightly tap the jar again to even out the crumbs.  Repeat with the rest of the jars.

4. Using the same large plain round tip, fill another pastry bag with the pumpkin pudding mixture.  Pipe this mixture onto graham cracker crust layer, in the same manner as the first whippy cream cheese layer.  Lightly tap again and repeat with the rest of the jars.

5. Add a dollop of the reserved sweetened whippy cream (without the added cream cheese) to the top of each pie with a spoon, or pipe a more refined swirl using the same large plain round tip.  Finish with a sprinkling of graham cracker crust and chocolate shavings, if desired. image *If transporting jars with their lids screwed on, allow for whipping cream not to get smashed when lid is added.

*These jars of pie can easily be made the day prior to serving. Better if chilled overnight.

Yield: 10 to 12 jars of pie

Linda

Caramel Apple Layer Cake with Apple Cider Frosting

And for the grand finale, guests were tempted with two dessert choices; Caramel Apple Layer Cake with Apple Cider Frosting (made with homemade caramel sauce) or Layered Pumpkin Pie in a Jar.

Which would it be?  It was overheard that some guests had a difficult time deciding and were “forced” to sample both.

Could that be true?  We’ll never tell!

image

Caramel Apple Layer Cake with Apple Cider Frosting

Ingredients:

2 cups whole wheat pastry flour

1 ¾ cups all-purpose flour

1 tablespoon baking powder

1 ½ teaspoons baking soda

1 ½ teaspoons ground cinnamon

½ teaspoon salt

1 ½ cups light brown sugar

¾ cup canola oil

¾ cup unsweetened applesauce

¾ cup caramel sauce (homemade or jarred)

2 teaspoons vanilla extract

3 eggs

1 ½ cups buttermilk

Ingredients for Apple Cider Frosting:

7 ½ -8 cups confectioners’ sugar (to desired consistency)

¾ cup (1 ½ sticks) butter, softened

½ cup apple cider or apple juice

¾ teaspoon ground cinnamon

Pinch of salt

image

Directions:

1. Preheat oven to 350 degrees.  Grease and flour two (8 or 9 inch) round cake pans and set aside.

2. In a large bowl, whisk together whole wheat pastry flour, all-purpose flour, baking powder, baking soda, cinnamon and salt.  Set aside.  In a second large bowl, beat sugar and oil together with an electric mixer until well combined, about 30 seconds.  Add applesauce, caramel and vanilla, beat for 30 seconds, then add eggs one at a time, beating well after each addition.  Add flour mixture in three parts, alternating with the buttermilk, and continuing to beat until well combined.

3. Pour batter into prepared cake pans and bake until golden brown and a toothpick inserted in the middle of each cake comes out clean, about 35-40 minutes.  Set aside to let cool for 10 minutes, then gently loosen cakes and turn out onto a cooking rack; set aside to let cool completely.

4. For the frosting, put sugar, butter, cider, cinnamon and salt into a large bowl and beat with an electric mixer until light and fluffy, about 5 minutes.  Arrange one cake on a large plate and spread about 1 cup of the frosting evenly over the top.  Arrange second cake on top then frost top and sides of entire cake with remaining frosting.  Set aside at room temperature or in the refrigerator for at least 1 hour to allow frosting to set before serving.

Yield: Makes a tall 2-layer, 8-9 inch round cake

Caramel Sauce 

Ingredients:

1 cup light brown sugar

½ cup butter, divided

½ cup light corn syrup

2 tablespoons heavy cream

½ teaspoon vanilla

1/8 teaspoon salt

Directions:

1. In a small heavy, non-aluminum saucepan, combine brown sugar and ¼ cup butter.  Bring to boil over moderate heat.  Whisk in the corn syrup, cream, vanilla and salt.

2. Reduce the heat to moderately low, and boil gently for about 3 minutes, stirring constantly.

3. Immediately remove from heat and whisk in the remaining ¼ cup butter.  Serve warm or at room temperature.

Yield: About 1 ½ cups

*This keeps well in a covered jar in the refrigerator for up to 4 months. 

Linda

Skillet Fried Corn

 Grandmother insisted on Silver Queen corn, always cooked it in a cast iron skillet and, yes, added 1 stick of butter.  Changes are not welcome here!Skillet Corn

Ingredients:

12 ears of corn, preferably super sweet “Silver Queen”

8 slices bacon

½ cup (1 stick) butter

2 to 4 tablespoons sugar, depending on the sweetness of the corn

2 teaspoons salt

½ teaspoon pepper

Harvest Lunch Including Skillet Fried Corn served on a bamboo plate.

Harvest Lunch Including Skillet Fried Corn served on a bamboo plate.

Directions:

1. Cut the kernels from the cobs into a large bowl.  Scrape off the remaining pulp and juice with a knife adding to the corn kernels.

2. Cook the bacon in a large cast iron skillet until crisp.  Remove to paper towels to drain; crumble.  Remove all but ¼ cup of the bacon drippings from the skillet.

3. Add the corn, butter, sugar, salt and pepper to the skillet.  Cook over medium heat for 20 minutes, stirring frequently.

4. Spoon mixture into a serving dish and top with the crumbled bacon.

Yield: 12 servings

Linda

Tomorrow we will post the Harvest Lunch dessert recipes.

For all the Harvest Lunch Recipes and others, go to Garden Recipes.