Category Archives: Uncategorized

Caramel Apple Layer Cake with Apple Cider Frosting

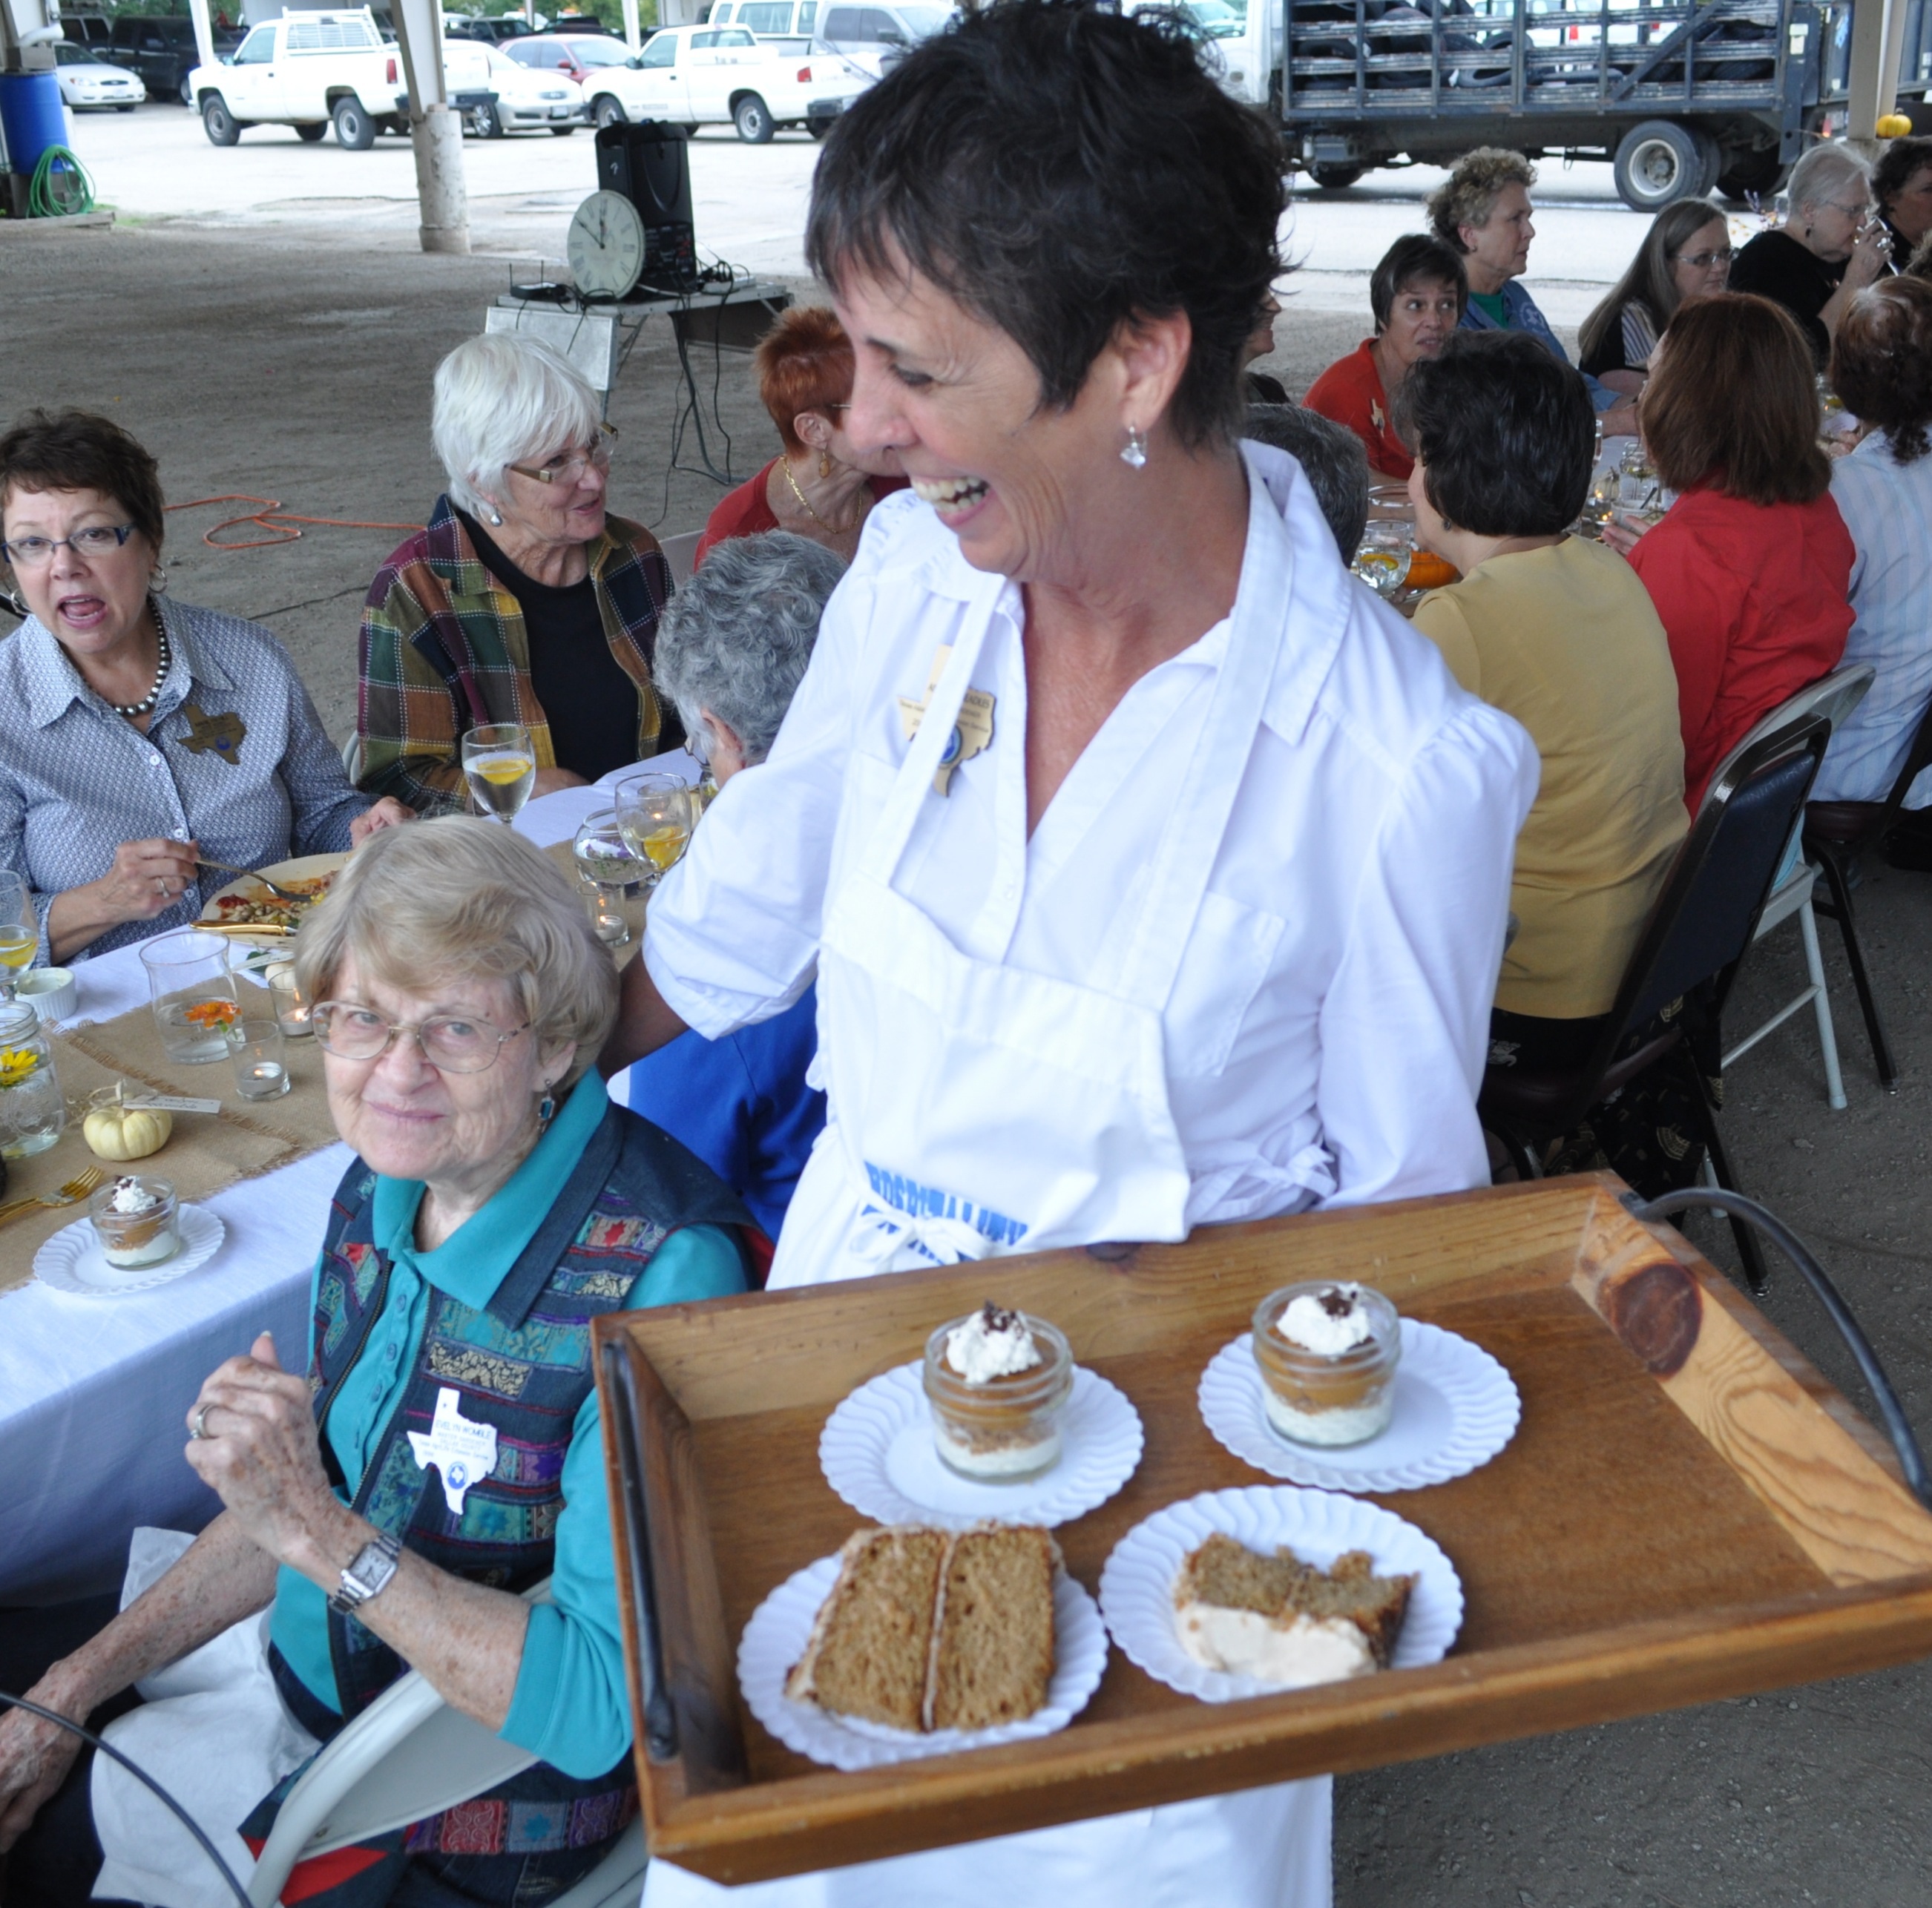
And for the grand finale, guests were tempted with two dessert choices; Caramel Apple Layer Cake with Apple Cider Frosting (made with homemade caramel sauce) or Layered Pumpkin Pie in a Jar.

Which would it be?  It was overheard that some guests had a difficult time deciding and were “forced” to sample both.

Could that be true?  We’ll never tell!

image

Caramel Apple Layer Cake with Apple Cider Frosting

Ingredients:

2 cups whole wheat pastry flour

1 ¾ cups all-purpose flour

1 tablespoon baking powder

1 ½ teaspoons baking soda

1 ½ teaspoons ground cinnamon

½ teaspoon salt

1 ½ cups light brown sugar

¾ cup canola oil

¾ cup unsweetened applesauce

¾ cup caramel sauce (homemade or jarred)

2 teaspoons vanilla extract

3 eggs

1 ½ cups buttermilk

Ingredients for Apple Cider Frosting:

7 ½ -8 cups confectioners’ sugar (to desired consistency)

¾ cup (1 ½ sticks) butter, softened

½ cup apple cider or apple juice

¾ teaspoon ground cinnamon

Pinch of salt

image

Directions:

1. Preheat oven to 350 degrees.  Grease and flour two (8 or 9 inch) round cake pans and set aside.

2. In a large bowl, whisk together whole wheat pastry flour, all-purpose flour, baking powder, baking soda, cinnamon and salt.  Set aside.  In a second large bowl, beat sugar and oil together with an electric mixer until well combined, about 30 seconds.  Add applesauce, caramel and vanilla, beat for 30 seconds, then add eggs one at a time, beating well after each addition.  Add flour mixture in three parts, alternating with the buttermilk, and continuing to beat until well combined.

3. Pour batter into prepared cake pans and bake until golden brown and a toothpick inserted in the middle of each cake comes out clean, about 35-40 minutes.  Set aside to let cool for 10 minutes, then gently loosen cakes and turn out onto a cooking rack; set aside to let cool completely.

4. For the frosting, put sugar, butter, cider, cinnamon and salt into a large bowl and beat with an electric mixer until light and fluffy, about 5 minutes.  Arrange one cake on a large plate and spread about 1 cup of the frosting evenly over the top.  Arrange second cake on top then frost top and sides of entire cake with remaining frosting.  Set aside at room temperature or in the refrigerator for at least 1 hour to allow frosting to set before serving.

Yield: Makes a tall 2-layer, 8-9 inch round cake

Caramel Sauce 

Ingredients:

1 cup light brown sugar

½ cup butter, divided

½ cup light corn syrup

2 tablespoons heavy cream

½ teaspoon vanilla

1/8 teaspoon salt

Directions:

1. In a small heavy, non-aluminum saucepan, combine brown sugar and ¼ cup butter.  Bring to boil over moderate heat.  Whisk in the corn syrup, cream, vanilla and salt.

2. Reduce the heat to moderately low, and boil gently for about 3 minutes, stirring constantly.

3. Immediately remove from heat and whisk in the remaining ¼ cup butter.  Serve warm or at room temperature.

Yield: About 1 ½ cups

*This keeps well in a covered jar in the refrigerator for up to 4 months. 

Linda

Okra Pilau For Dinner Tonight

I am making this okra recipe tonight!  Last summer I let you know of my obsession  with okra. For an okra review: click here.

Green Fingers Okra in a Dallas Garden

Okra Pilau

Yield: 4 servings

8 bacon slices, diced
11/2 cups sliced fresh okra*
1 large onion, chopped
1 green bell pepper, chopped
11/2 cups uncooked long-grain rice
1/2 teaspoon salt
1/4 teaspoon pepper
2 cups water or chicken stock

Cook bacon in a large skillet until crisp; remove bacon, reserving 2 tablespoons drippings in skillet.

Sauté okra, onion, and bell pepper in hot drippings over medium-high heat 5 minutes or until tender. Stir in rice and next 3 ingredients; bring to a boil. Cover, reduce heat, and simmer 20 minutes or until water is absorbed and rice is tender. Remove from heat; stir in bacon. Let stand 5 minutes.

You can use any variety of okra (preferably from your garden) for this recipe that Tim says will make okra lovers of us all.

Red Velvet Okra will be in my skillet tonight.  I love it’s color even though the okra turns green when cooked.

Red Burgundy Okra, Dallas Garden BuzzYou can’t eat Okra leaves but how lovely they are to have in your garden. Harvesting Okra every day requires your careful attention and looking in and around the whole plant and under every leaf to find Okra that may be hiding.  if you let it go an extra day, you end up with giant Okra good for drying and seed saving but not much else.

Okra Leaf, Dallas Garden Buzz

For the healthy benefits of okra including a hair rinse recipe, read this.

Ok now, all this about Okra is persuading me to get out in the garden and start picking.  Hope you are, too.

Ann

Tomato Grafting Part II

Purpose:  To improve tomato production, some say as much as 30% by grafting a tasty tomato onto a hybrid which is disease resistant

Materials Needed:

  • 2 clear plastic cups, one to fit inside the other to form the healing chamber
  • New Double edge razor blade-clean and sharp, snapped in half lengthwise while in paper cover
  • New Grafting clips-match the size of the clip to the size of your tomato stalk (Jim bought clips here)
  • Rootstock and scion seedlings of matching stem size(we used Celebrity as the rootstock and Brandywine as the scion or top)

Water your plants the night before and pick a clean area indoors without direct sunlight and no fan or draft.  Tomato Seedlings Lined up for Grafting Select your seedlings. We grafted Brandywine tomatoes onto Celebrity.

Jim had 100% germination rate so we had to pick one seedling from each pot to use.  Look at the healthy roots coming out of the pot!

Tomato Seedling Ready to GraftJim suggested cutting the scion and rootstock straight across.  Remember you want matching stem size.Tomato GraftingPlace the grafting clip on the scion halfway over the cut stem, then join to the other stem so the cuts match up.

Silicon Clip on Cut Tomato Stalk

You will be able to see through the silicon clip to make sure the cut surfaces match up. Place your new grafted tomato plant in the bottom of a plastic cup, this will become the healing chamber.  Slide the smaller cup on top making sure it does not touch the leaves.

image

The plant should stay closed in the healing chamber for 3 days with no direct sunlight. Check the grafted tomato from outside.  If it wilts, open the chamber and mist or water the plant to raise the humidity level. Reclose the chamber.

4th Day-Open the healing chamber to see if the plant is moist.  Add water if needed and close.

5th Day-Make a small opening in the tunnel so some of the humidity can begin to escape.  Check frequently.  If plant wilts, close the tunnel back up, increase humidity by watering or misting and try ventilating the next day.

Don’t remove the clip. The  silicone clip will expand with the growth of the plant and eventually fall of by itself.

Let the plant grow indoors.  It will take 1-2 weeks longer to be ready to go outdoors to the tomato patch because it will have stopped growing during the healing process.

When transplanting, make the sure the graft union is above the soil line.

Thank you, Jim, for growing the plants and guiding us through the tomato grafting process!

Ann

Blackberry Class And Lunch In Our Blackberry Patch

Take the mystery out of growing blackberries. 

Come to the Earth- Kind ® WaterWise Demonstration Garden

at 2311 Joe Field Road

to hear Tim Allsup give an outdoor talk about how to grow ‘em and which varieties he likes, and how to prune ‘em! 

Date: Tuesday, June 4th                   Blackberries, Some Ripe                                                                    

Time: 11:00am-Noon

Place: 2311 Joe Field Road

Reservations: glamb@flash.net or sign up by leaving a comment on this blog.

Cost: $5.00 each person to be paid when you arrive for class 

Guests welcome, Master Gardeners will receive one hour education credit.

“Blackberry Lunch” 

Smoked Turkey, Mozzarella, and Blackberry Sandwiches 

Spinach Berry Salad with Blackberry Balsamic Vinaigrette 

Blackberry Lemonade

 Dessert Smorgasbord 

Blackberry Crumb Bars 

Fresh Blackberry Cake 

Blackberry Puffs 

Lemon Blackberry Swirl Pound Cake

Menu by Linda

Picture by Starla

Recipes will be included on our blog next week.


Arugula

Wild Arugula, Upper Left Corner

Some Herbs behave and have benign reputations.  Others like Arugula, are said to be  pushy, narcissistic  snobs.  Pushy, yes, if you don’t like bold peppery flavor, don’t try Arugula on your sandwich or in your salad. There’s a reason Arugula is also known as Rocket or Roquette!  And Arugula likes itself enough to fling its seeds all over the garden so maybe it is narcissistic.  Like much in life, though, the snob label isn’t fair. Arugula is pricey at approximately $6 a pound in the grocery store and it is true that it’s peppery leaves are appreciated by the white wine crowd, but any gardener can  plant arugula easily in a sunny spot and enjoy it in all the recipes we are going to provide. 

Transplants can be bought now and planted in your Dallas area gardens.Wait a few weeks to plant by seed.  I asked some of my favorite Dallas County Master Gardeners about Arugula and here is what they said. Ann

 Arugula

It’s pronounced ah-ROO-guh-lah!

SALADS

mmmm I like it so much I have trouble getting it to the kitchen uneaten.  With pears, I’d say Bosc pears and pear flavored white balsamic vinegar for dressing. Deirdre

We enjoyed an Arugula-Pear-Blue Cheese Salad as part of Christmas dinner.  Place arugula in a large serving bowl.  Top with Bartlett pears, cut in six wedges, crumbles of a good blue cheese, and toasted pecans or walnuts. Drizzle with a vinaigrette made with olive oil, Champagne vinegar, a shallot, and Dijon mustard. Elizabeth  

Here is an Arugula Salad that I have been making for many years.  Makes a fresh and flavorful addition to almost any meal. 

Arugula, Tomato and Avocado Salad 

8 cups loosely packed arugula, torn into bite-size pieces

16 ounces plum tomatoes, chopped

4 stalks canned hearts of palm, sliced

2 avocados, peeled, pitted and chopped

5 tablespoons extra-virgin olive oil

3 tablespoons fresh lemon juice

Salt and Pepper to taste

1 (12-ounce) wedge Parmesan cheese

1/4 cup pine nuts, toasted 

Combine the arugula, tomatoes, hearts of palm and avocados in a large bowl.  Whisk the olive oil and lemon juice in a small bowl.  Season with salt and pepper.  Add to the salad and toss to coat.  Shave strips of the Parmesan cheese over the salad using a vegetable peeler.  Sprinkle with the pine nuts.  

Yield: 4 servings, or more  Linda 

Wild Arugula Left, Regular Arugula Right

SANDWICHES

Arugula is something everyone should grow. There are two kinds: the regular that goes in the cool times and the rustic or wild arugula that loves the heat.  Both are aggressive in self seeding so people need to be aware, but well worth it.  Using it in sandwiches alone is worth growing–no need to have the most expensive mustard anymore–arugula has a complex mustardy nutty taste that elevates a sandwich. The cool season, regular arugula has such lovely flowers–completely edible and bees love them too.  I was just outside and my arugula is starting to bloom and it was covered in honey bees. Susan 

Prosciutto Wrapped Greens: Whisk 3 Tablespoons olive oil, 2 teaspoons red wine vinegar, 2 teaspoons fresh lemon juice, ½ teaspoon Dijon mustard in a bowl and season with salt and pepper, add 2 tablespoons freshly grated Parmigiano-Reggiano cheese and toss with arugula to coat the greens lightly. Squeeze the greens together. Cover with thin slices of prosciutto and roll into a log.  Cut the log into 2 inch pieces on the diagonal. Delish! Martha 

PESTO

Arugula pesto is a tangy twist. Make it just as you would a regular basil pesto.  You can substitute toasted walnuts or pecans for the pine nuts. Annette 

ANYTHING

I mostly eat it raw in salads, but when I have an abundance I do it much like Kale or Swiss Chard and put it literally in most anything: a stir fry, stuffed peppers, in any sauce, in soups. We LOVE arugula, especially the heirloom kind that reseeds itself. Steve 

My sentiments on arugula echo those you already have—I love it, too (but my husband doesn’t, so I have to sneak a bit into milder salad greens.)  From a gardening standpoint, it’s one of the easiest greens to grow—I think its germination rate must be 110%, so it’s great for gardeners without much experience growing plants from seed.  The younger tender leaves have the best flavor for fresh use.  As the plant begins to bloom, the larger leaves can be tough.  However, the edible flowers are delightful in salads, dips, and spread or sprinkled on creamy soups.  And toss a handful of leaves into Tuscan bean soup—divine!  Ditto the pear salad idea.  We’re having a family celebration tonight with a composed salad starter of roasted pears with blue cheese, walnuts, and craisins on a bed of arugula with a light lemon scented vinaigrette.  Marian 

I have used Arugula and cooked with it instead of spinach!  It worked fine and had a good taste.  We just have to be creative! Andria 

NUTRITION

I don’t usually grow arugula because it’s high in vitamin K and I cannot eat it.  I have grown it for my daughter; she loves it juiced and raw in salads. Paula 

Arugula is a popular aromatic green with a mild nutty flavor and slight peppery bite. It is delicious in salads and may also be used in soups, pasta and vegetarian dishes.
Wild Arugula, also known as Rocket, is more peppery and adds a nice spicy flavor to salads. Wild arugula leaves are more serrated and peppery than regular arugula.
Arugula has more vitamin C, calcium and beta carotene than most other salad greens. foodreference.com

A September Garden Field Trip

Our Garden is certified as a Wildlife Habitat. When  children are interested in  nature; they  learn about protecting habitats and become engaged with their environment.  Being outside in an area that provides food, water, and cover for wildlife, gives them the chance to observe frogs, fish, rabbits, birds, butterflies,  dragonflies, and the occasional visit from our Mr.Cottontail. 

Teaching In The Wildlife Habitat At The Demonstration Garden

We teach the virtues of vermicomposting.  Red wriggler worms easily hold the attention of these students. 

Vermicomposting Taught By Dallas County Master Gardeners For Kids

Kids that visit our gardens like to take home something they can grow.  The Grace Academy kids learned about seeds and planted them in  “Root Viewers”, made out of  recycled rinsed out milk cartons with a plastic window made of tape.

Gardening With Grace Academy Kids

The “Mild” Habanero And The Eggplant

Never take your daughter with you to buy vegetable transplants. Molly seemed like a safe bet; this 24-year-old hasn’t cooed over anything but boyfriends and clothes since she turned 11. But show her the 4-inch veggies all waggling their cute little leaves and begging to come home with you, and don’t you know it, Molly’s like a preschooler with a batch of free puppies.  She wanted them all.

That’s how we ended up with The “Mild” Habanero and The Eggplant.

Eggplants And Habaneros On The Kitchen Counter

For the summer garden, we planted squash, cantaloupe, and watermelon seeds and transplants of tomatoes—plus the habanero and eggplant.  Now two months later, the cantaloupe seeds never sprouted, beetles decimated the squash and watermelon, and the tomatoes have decided that it’s too hot to do much of anything.

Of course, the habanero and eggplant have thrived.  

The tag on the habanero read “mild”—as compared to what? A ghost chili?  And you’ve never seen a more prolific pepper; at least 25 chilies in shades of green, yellow, and orange hang from its branches.  Perhaps one could blend up a concoction of chilies and vinegar strong enough to repel squirrels or wayward cats, but otherwise the peppers are too hot to use in anything.

Eggplant growing in a raised bed at the Demonstration Garden in Dallas

The eggplant is now the size of a small shrub.  At least six of the most beautiful aubergine purple globes dot its sturdy branches.  Eggplants are much loved by cooks; the English and French call them aubergines.  Crayola even named a pink-purple-grey color crayon eggplant in 1998. 

In my kitchen, I have grilled, fried, stewed, stuffed, and rolled eggplant—all with the same conclusion.  I don’t like eggplant.  I tried, but no.

So, here we have it.  The stars of my August garden are inedible or underappreciated. Perhaps I could put a little vegetable stand out by the mailbox with an honor system jar for quarters.  Habaneros and Eggplant—Name Your Price…

Elizabeth

Basil Lime Shortbread

Basil Lime Shortbread With Basil Sprig

¾ cup unsalted butter

½ cup confectioner’s sugar

¼ teaspoon vanilla extract

¼ teaspoon salt

1 ½ cups all-purpose flour

¼ cup finely chopped fresh basil

2 tablespoons fresh lime zest

 1.  In a medium bowl and using an electric mixer at medium speed, cream the butter and confectioner’s sugar together until light and fluffy.  Beat in the vanilla extract and salt.  

2.  In a small bowl, toss together the flour, basil, and lime zest.  With the mixer at low speed,  add the flour mixture to the butter mixture, and mix until the dough just comes together and forms a ball.  Remove the dough from the bowl, wrap tightly with plastic wrap, and refrigerate for 2 hours. 

3.  Preheat oven to 350 degrees.  Line 2 baking sheets with parchment paper, and set aside. 

4.  On a lightly floured surface, roll the dough out to 1/8-inch thickness, and using a 2-inch round fluted cutter, cut cookies.  Place on prepared baking sheet, and bake for 8 to 10 minutes, or until edges begin to brown.  Cool on wire racks before serving. 

Yield:  24 cookies

Recipe from Victoria Bliss Magazine, March/April 2009

Linda

Fall Gardening in Dallas

FALL GARDENS 

Are Dallas gardeners just looking for any excuse to work in this heat? Listen to Common Sense here: the middle of July is reserved for racy spy novels, tall glasses of iced tea, and Spider Man movies. Settle onto that couch, look at the garden out the window, and move only to refill the pitcher of mojitos.

Obviously Jim, our Earth-Kind® and WaterWise Demonstration Garden vegetable guru, didn’t get that memo.  By late June he already had diagrams, plans, flow charts, and supplies for the Fall Garden. He sprouted a frenzied list of freeze dates and vegetable maturation periods.  He is more organized than Martha Stewart. 

 looking at Vegetable Beds for the Dallas Fall Garden

Trowel at the ready, the first veggies called up were tomatoes; their installation set for June 15 to July 25. Right on their heels are the Thanksgiving favorites: acorn and butternut squash for July 1 to August 1.  Sugar pumpkins and cole transplants are set for July 15 to August 15.  Green and yellow beans step up from August 1 to September 1.  Spinach, carrots, lettuce and radishes go in from August 15 to September 10. And finally, mustard greens, beets, and turnips will be planted from August 25 to September 5.  

Just makes you want to sweat. 

Really, if you think about it, Texas is in denial about autumn.  We really have extended summer through mid-October served up with a large dose of fall allergies.  

I know this from personal delusion.  Mike and I scheduled our wedding for October 1, thinking of cool breezes, rustling leaves, pumpkins, and mums.  San Antonio weather sprung a record-breaking heat wave, and sweat rolled off the wedding party. 

But what Dallas gardeners In The Know will tell you is that if you get off the couch, fill your compost pile with the scraggly spring tomato vines, and plant now in the summer heat, you can have a blockbuster fall harvest.  Cooler autumn temperatures coax bumper crops of tomatoes and pumpkins.  Come see Jim’s fall garden! 

Elizabeth

Click Here to see the Fall Garden Plan for our Raised Beds