Tag Archives: Dallas Farm to Table

Bee Expert, Local Honey Tastings & Lunch

Bee on Blanket Flower

 TAKE THE “STING” OUT OF TAXES

Bee Expert, Local Honey Tastings & Lunch

It’s a Honey of a Deal!

Tuesday April 15 Ÿ10:30 a.m.-12:00 noon

$20 per person Ÿ Limited Reservations

EARTH-KIND®/WaterWise Demonstration Garden Ÿ 2311 Joe Field Rd.

Bee Expert David McCarty will tell you:

Ÿ Why are honeybees brilliant?

Ÿ Which bees produce the most honey?

Ÿ Why is the honeybee referred to as a well-designed engine?

Ÿ Why is the “waggle” dance a kind of honeybee GPS?

 Hello, Honey! Menu 

Appetizer Tray featuring Marcona Almonds & Artisanal Cheeses

Drizzled with Tranquility Hill Honey RanchŸ

Goat Cheese Handkerchiefs with Tart Cherries & SageŸ

Smoked Turkey, Red Grape & Pistachio Salad

With Creamy Honey-Dijon DressingŸ

Honey-Pecan Tart with Honey Ice CreamŸ

Iced Honey Lemon Tea

Your check is your reservation and must be received by April 5th.  No refunds.

Make checks payable to: DCMGA.

Email: dallasgardenbuzz@gmail for the address of where to send your checks.

Hearts and Roses Luncheon Desserts

Red Velvet Cake

Hearts and Roses Lunch-Red Velvet Cake

Ingredients:

½ cup butter, softened

1 ½ cups sugar

1 tablespoon white vinegar

1 teaspoon vanilla extract

3 large eggs

1 (1-ounce) bottle liquid red food coloring

2 ½ cups all-purpose flour

2 tablespoons cocoa

1 teaspoon baking soda

½ teaspoon salt

1 cup buttermilk

Cream Cheese Frosting

Directions:

1.  Beat butter at medium speed with an electric mixer until creamy; gradually add sugar, vinegar, and vanilla, beating well.  Add eggs, 1 at a time, beating until blended after each addition.  Add food coloring, beating until combined.

2.  Combine flour and next 3 ingredients; add to butter mixture alternately with buttermilk, beginning and ending with flour mixture.  Beat at low speed until blended after each addition.  Pour into 2 greased and floured 9-inch cake pans.

3.  Bake at 350 degrees F for 20 to 25 minutes or until a wooden pick inserted in center comes out clean.  Cool in pans on wire racks 5 minutes; remove from pans, and cool on wire racks.

4.  Spread Cream Cheese Frosting between layers and on top and sides of cake.

Yield: 1 (2-layer) cake

Cream Cheese Frosting

Ingredients:

1 (8-ounce) package cream cheese, softened

½ cup butter

1 (16-ounce) package powdered sugar

1 ½ teaspoons vanilla extract

1 cup chopped pecans

Directions:

1.  Beat cream cheese and butter until creamy; gradually add sugar and vanilla, beating well.  Stir in pecans.

Yield:  3 cups

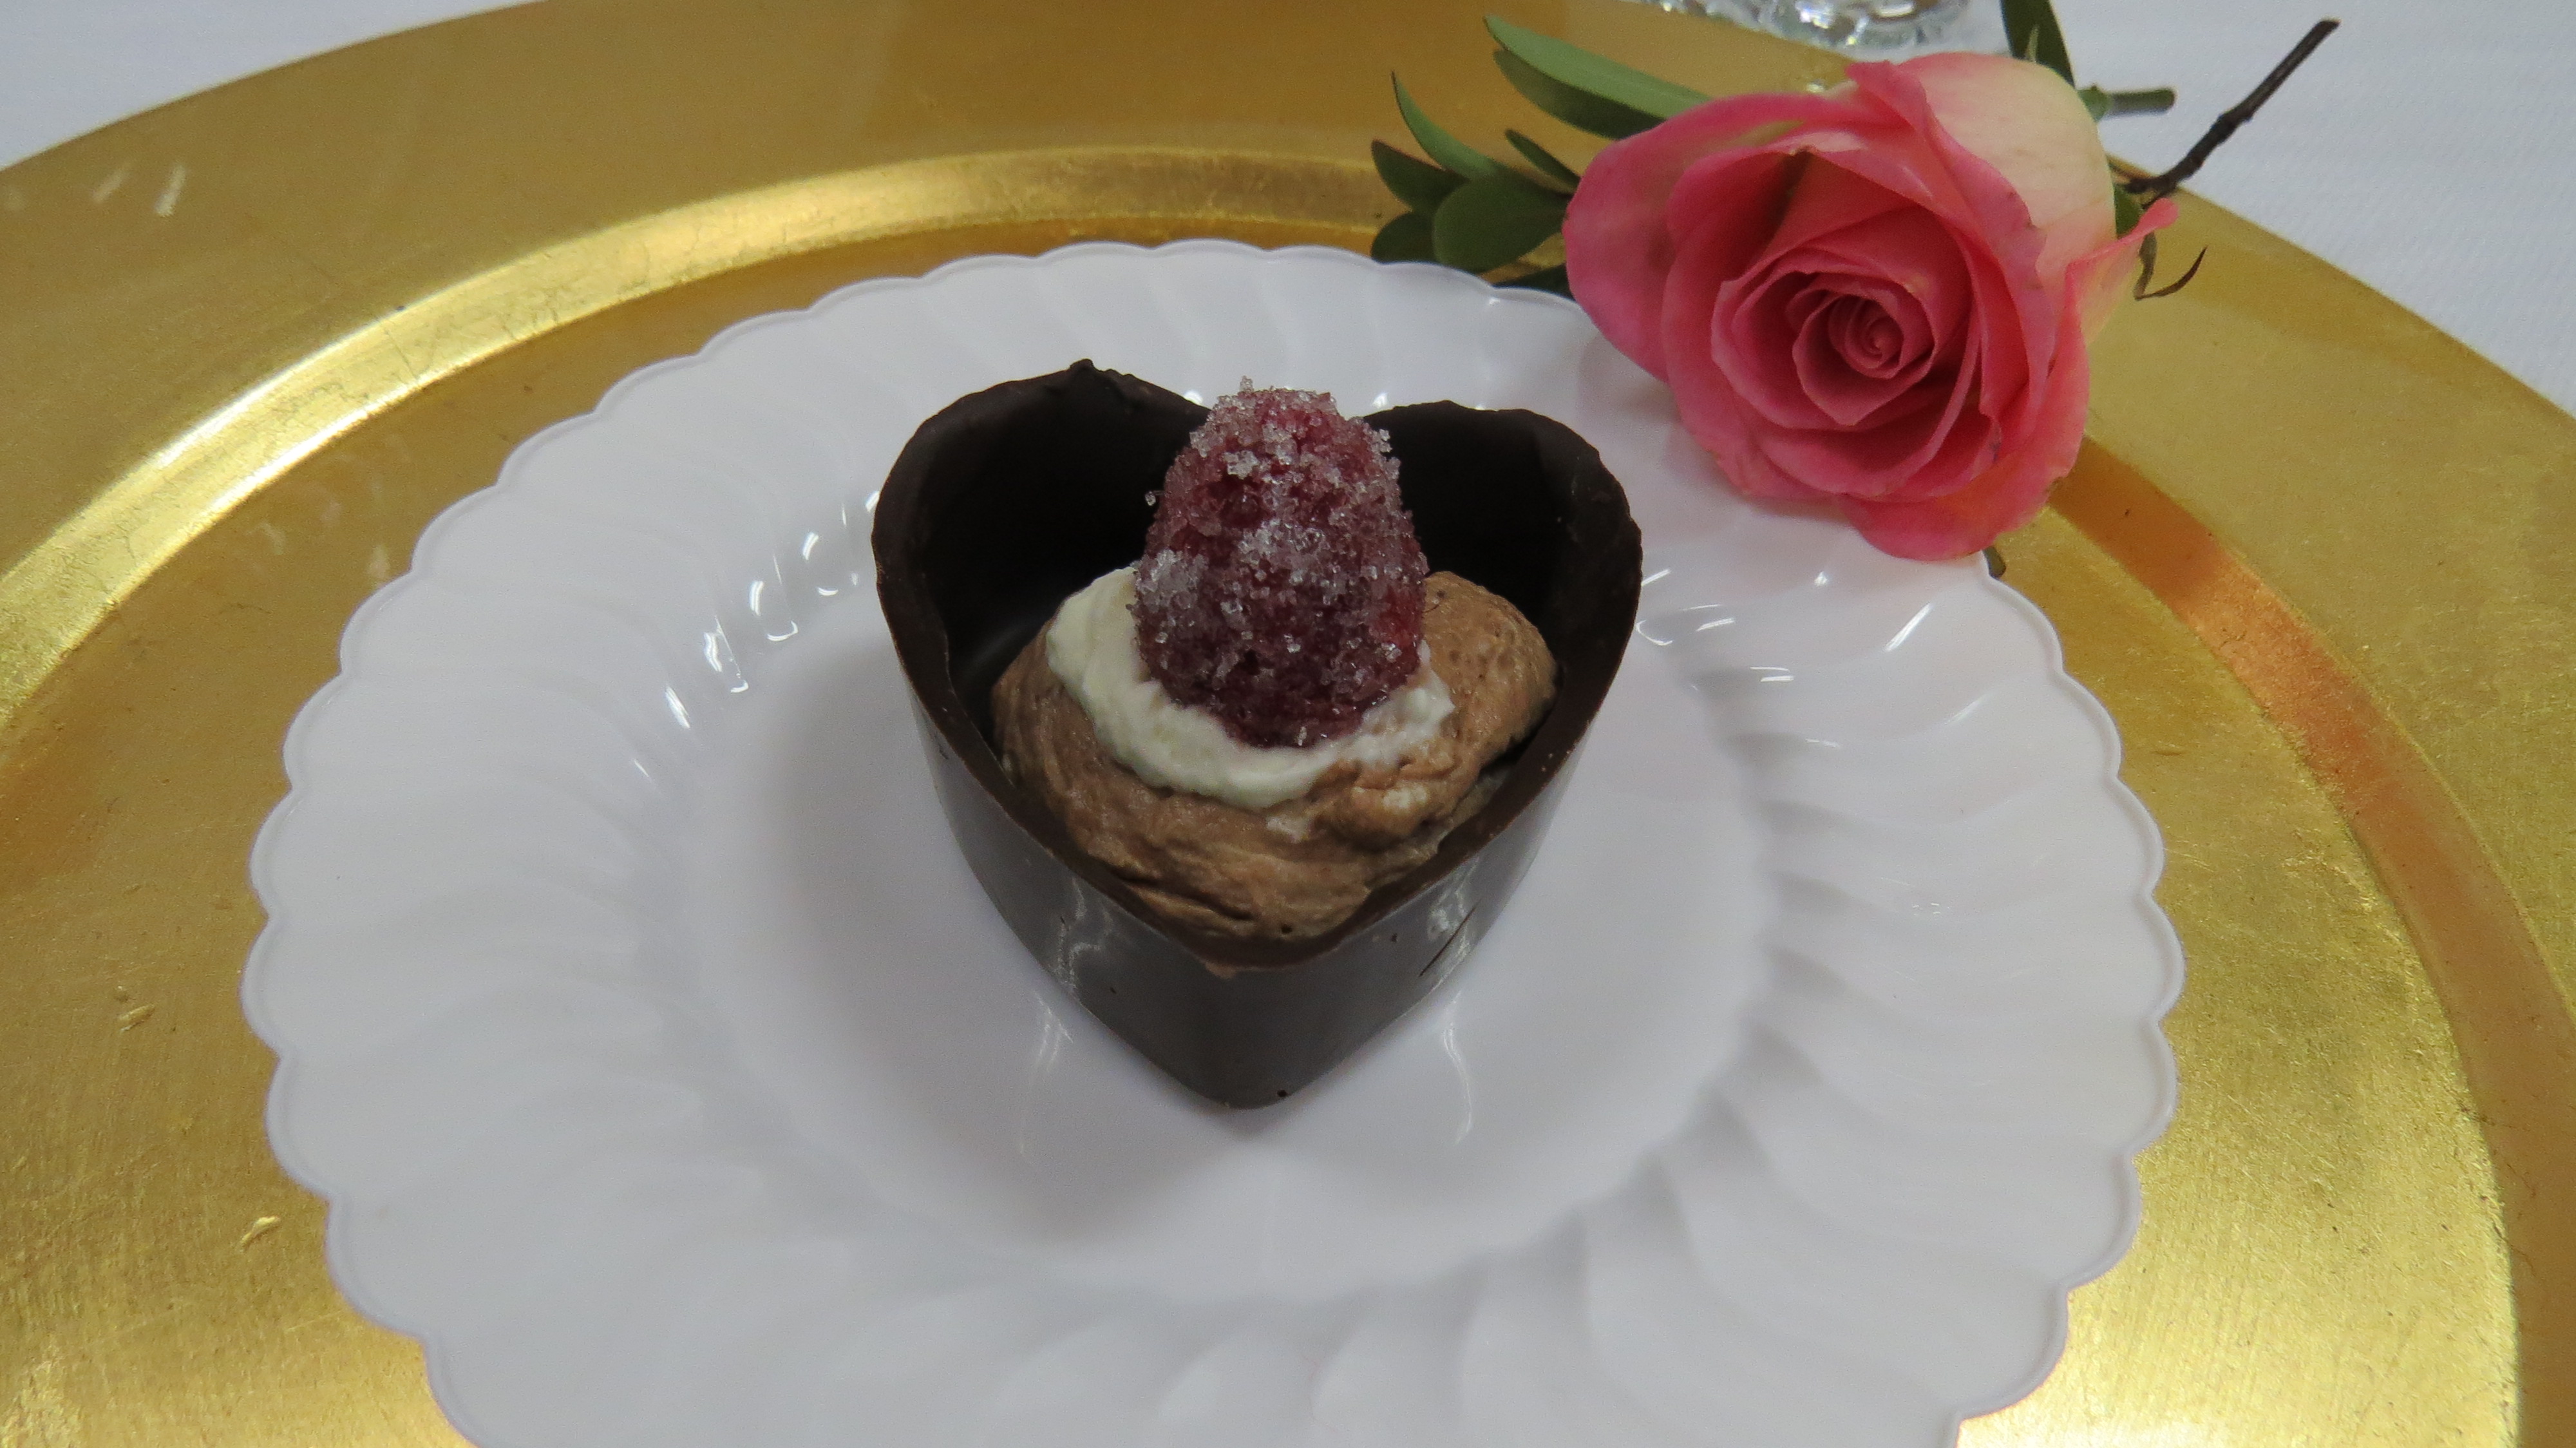
Creamy Chocolate Mousse

Hearts and Roses Lunch Dessert


Ingredients:

3 eggs, separated

1 ½ teaspoons vanilla extract

½ teaspoon almond extract

4 (1-ounce) squares semisweet chocolate, melted and cooled slightly

½ teaspoon cream of tartar

½ cup sugar

1 cup whipping cream

Directions:

1.  Beat egg yolks lightly; add flavorings and chocolate to egg yolks, stirring well.

2.  Beat egg whites (at room temperature) and cream of tartar at high speed of an electric mixer until frothy.  Gradually add sugar, 1 tablespoon at a time, beating until stiff peaks form and sugar dissolves (2 to 4 minutes).  Stir about one-fourth of meringue into chocolate mixture; fold remaining meringue into chocolate mixture.

3.  Beat whipping cream at medium speed of an electric mixer until soft peaks form; fold cream into chocolate mixture.  Cover and chill at least 2 hours.

Yield:  5 cups.

How to Make Sugared Raspberries

Ingredients:

1 cup of raspberries (or other whole, small summer fruit such as blueberries, small strawberries or blackberries)

1 egg white

½ cup sanding sugar

Directions:

1.  Select the firmest, plumpest raspberries to work with.  This will help the final berries retain their shape and they’ll be less likely to turn into a juicy, sugar puddle.

2.  Lightly paint egg white onto entire outer surface of raspberry (using a small pastry brush).  Make sure to get the base and the top of the berry completely covered.  Dipping the fruit into the egg white is not recommended; it becomes messy and doesn’t turn out as well.

3.  Pour about ½ cup sanding sugar onto a plate to use for sugaring.

4.  Place fruit on plate and sprinkle with sugar.  Gently rolling the raspberry in sugar works too.  Be careful not to squeeze or push too hard, breaking the berry.

5.  Coat the raspberry in sugar as evenly as possible.

6.  Dry sugared raspberries on a parchment-lined baking tray for 4 to 8 hours, resting the fruits in a cool, dry place.  Humidity will affect this process, so if your home is very humid, you may want to try this recipe at a different time.

7.  Enjoy just a few berries as a garnish to any dessert (they are very sweet and strong!)

Serving suggestions for sugared raspberries:  Use as a topping for creamy chocolate mousse, angel food cake smeared with lemon curd, or gingerbread topped with whipped cream and a pretty sugared raspberry sitting on the top.  Or, how about a delicious piece of homemade pound cake topped with a combination of sugared berries?  Yummy!

Linda

Hearts and Roses Luncheon

rose-demo garden“Hearts and Roses”

An Enchanting Valentine’s Lunch and Lecture

At the Joe Field Earth-Kind/®WaterWise Demonstration Garden

Tuesday*February 11, 2014*11:00am

$14.00 per person*Limited to 25 Guests

Menu 

Apricot-Cheese Truffles

Strawberry Spinach Salad with Poppy Seed Dressing

Old-Fashioned Chicken and Dumplings

Chocolate Boxes filled with Sugared Raspberries or Red Velvet Cake

Vanilla Cinnamon Pecan Coffee*Herbal Iced Tea

***

Special Presentation by Vicki Agee, Dallas County Master Gardener and Rosarian

“Landscaping with Roses” (Earn One Hour Education Credit)

  Your check is your reservation.

 Make checks payable to: DCMG.

 Email dallasgardenbuzz@gmail.com for info about mailing your check.

Payment must be received by February 1st


Basil Harvest

Today at the garden we harvested buckets full of sweet basil.  With winter’s chill at our doorstep it’s the perfect time to fill our freezers with basil pesto. Basil Harvest

 Here is  Classic Pesto hidden in our Tomato Tart Recipe!

Basil ready for the freezer

Before bedtime and  the freeze tomorrow, review

 Basic Facts About Basil Here!

Sweet Dreams, I will be dreaming about basil and hope you will, too!

Linda

Layered Pumpkin Pie in a Jar

imageLayered Pumpkin Pie in a Jar

Ingredients:

For the graham cracker crust layer:

1 ½ cups graham cracker crumbs

3 tablespoons brown sugar

½ teaspoon cinnamon

½ teaspoon salt

4 tablespoons unsalted butter, melted and slightly cooled

For the whippy cream cheese layer and finishing dollop of sweetened whipped cream:

2 cups heavy whipping cream

1 ½ cups sifted powdered sugar

8 ounces cream cheese, at room temperature

2 teaspoons pure vanilla extract

For the pumpkin layer:

1 cup milk

1 (15-ounce) can pumpkin puree (not pre-spiced pumpkin pie filling)

2 packages (4-serving size) Jell-O vanilla flavor instant pudding and pie filling

1 ½ teaspoons cinnamon

¼ teaspoon ginger

1/8 teaspoon cloves

Optional:  semi-sweet chocolate shavings to sprinkle over the top image Directions:

1. Preheat oven to 350 degrees.  Place the mixing bowl and beaters for beating the cream into the freezer to chill.

For the graham cracker crust layer:

1. Stir together the graham cracker crumbs, sugar, cinnamon, and salt.  Then add the melted butter and stir until evenly moistened.  Spread mixture in a 9” x 13” pan and bake for 5 minutes.  Stir and bake for another minute or two, or until crumbs are fragrant and nicely browned.  Be careful not to burn.  Remove from oven and let cool completely while you prepare the other pie layers.

For the whippy cream cheese layer and finishing dollop of sweetened cream: 1. Using your chilled bowl and beater, whip the cream until stiff.  Add the powdered sugar and beat just to combine.  Remove sweetened whipped cream to another bowl and set it in the refrigerator.  Add the cream cheese to the same chilled bowl and cream until very smooth, about 1 to 2 minutes.  Blend in vanilla.  Now add half of the sweetened whipped cream back into the chilled bowl with the cream cheese, gently folding to thoroughly combine.  Place the bowl of whippy cream cheese and the remaining half of the sweetened whipped cream back into the refrigerator to stay chilled.

For the pumpkin layer:

1. Pour the milk into a large bowl.  Add the pumpkin, pudding mixes, and spices.  Beat with a wire whisk for 2 minutes, or until very well blended.  The mixture should be quite thick.

2. Fill a pastry bag fitted with a large plain round tip (ex. Ateco No. 808) with the whippy cream cheese mixture.  Pipe a layer of this mixture onto the bottom of a jar, starting at the perimeter of the jar and working to the center.  Lightly tap the jar on a towel (so jar doesn’t break) on the counter, to settle the mixture in.  Repeat this step with the rest of the jars.

3. Sprinkle the whippy cream cheese layer with 2 tablespoons of baked graham cracker crumbs.  Lightly tap the jar again to even out the crumbs.  Repeat with the rest of the jars.

4. Using the same large plain round tip, fill another pastry bag with the pumpkin pudding mixture.  Pipe this mixture onto graham cracker crust layer, in the same manner as the first whippy cream cheese layer.  Lightly tap again and repeat with the rest of the jars.

5. Add a dollop of the reserved sweetened whippy cream (without the added cream cheese) to the top of each pie with a spoon, or pipe a more refined swirl using the same large plain round tip.  Finish with a sprinkling of graham cracker crust and chocolate shavings, if desired. image *If transporting jars with their lids screwed on, allow for whipping cream not to get smashed when lid is added.

*These jars of pie can easily be made the day prior to serving. Better if chilled overnight.

Yield: 10 to 12 jars of pie

Linda

Skillet Fried Corn

 Grandmother insisted on Silver Queen corn, always cooked it in a cast iron skillet and, yes, added 1 stick of butter.  Changes are not welcome here!Skillet Corn

Ingredients:

12 ears of corn, preferably super sweet “Silver Queen”

8 slices bacon

½ cup (1 stick) butter

2 to 4 tablespoons sugar, depending on the sweetness of the corn

2 teaspoons salt

½ teaspoon pepper

Harvest Lunch Including Skillet Fried Corn served on a bamboo plate.

Harvest Lunch Including Skillet Fried Corn served on a bamboo plate.

Directions:

1. Cut the kernels from the cobs into a large bowl.  Scrape off the remaining pulp and juice with a knife adding to the corn kernels.

2. Cook the bacon in a large cast iron skillet until crisp.  Remove to paper towels to drain; crumble.  Remove all but ¼ cup of the bacon drippings from the skillet.

3. Add the corn, butter, sugar, salt and pepper to the skillet.  Cook over medium heat for 20 minutes, stirring frequently.

4. Spoon mixture into a serving dish and top with the crumbled bacon.

Yield: 12 servings

Linda

Tomorrow we will post the Harvest Lunch dessert recipes.

For all the Harvest Lunch Recipes and others, go to Garden Recipes.

Roasted Butternut Squash Salad with Warm Cider Vinaigrette

Last Tuesday, you would have found Dallas County Master Gardeners on Joe Field Road busy preparing our first and (will be repeated) ” farm to table” lunch.

image

Craving just the right salad for your own fall feast? Here is our recipe for roasted butternut squash salad with the,oh so good, warm vinaigrette.

Ingredients:

1 (1 ½-pound) butternut squash, peeled and ¾-inch diced

Good olive oil

1 tablespoon pure maple syrup

Kosher salt and freshly ground black pepper

3 tablespoons dried cranberries

¾ cup apple cider or apple juice

2 tablespoons cider vinegar

2 tablespoons minced shallots

2 teaspoons Dijon mustard

4 ounces baby arugula, washed and spun dry

¼ cup walnut halves, lightly toasted

¾ cup freshly grated Parmesan cheese

image

Directions:

1. Preheat the oven to 400 degrees.

2. Place the squash on a sheet pan.  Add 2 tablespoon olive oil, the maple syrup, 1 teaspoon salt and ½ teaspoon pepper and toss.

3. Roast the squash for 15 to 20 minutes, turning once, until tender.  Add the cranberries to the pan for the last 5 minutes.

4. While the squash is roasting, combine the apple cider, vinegar, and shallots in a small saucepan and bring to a boil over medium-high heat.  Cook for 6 to 8 minutes, until the cider is reduced to about ¼ cup.  Off the heat, whisk in the mustard, ½ cup olive oil, 1 teaspoon salt and ½ teaspoon pepper.

5. Place the arugula in a large salad bowl and add the roasted squash mixture, the walnuts, and the grated Parmesan.  Spoon just enough vinaigrette over the salad to moisten, and toss well.  Sprinkle with salt and pepper and serve immediately.

Yield: 4 to 6 servings Adapted from Barefoot Contessa

Linda

A Mess of Peas with Spicy Chow Chow

A “Mess of Peas”

imageIngredients:

1 quart water

1 (8- to 10-ounce) smoked ham hock

8 cups fresh field peas

4 to 6 hot peppers in vinegar, drained

1 teaspoon sugar

1 teaspoon salt

1 teaspoon pepper

Directions:

1. Bring 1 quart water and smoked ham hock to a boil in a large Dutch oven over medium-high heat.  Reduce heat to low, and simmer 30 minutes.

2. Stir in peas and remaining ingredients; cover and simmer 25 to 30 minutes or until peas are done.

Yield: 10 to 12 servings

ChowChow

image

Ingredients:

5 green bell peppers

5 red bell peppers

2 large green tomatoes

2 large onions

½ small cabbage

¼ cup pickling salt

3 cups sugar

2 cups white vinegar (5% acidity)

1 cup water

1 tablespoon mustard seeds

1 ½ teaspoons celery seeds

¾ teaspoon turmeric

Directions:

1. Chop first 5 ingredients.

2. Stir together chopped vegetables and salt in a large Dutch oven.  Cover and chill 8 hours.  Rinse and drain; return mixture to Dutch oven.  Stir in sugar and remaining ingredients.  Bring to a boil; reduce heat, and simmer 3 minutes.

3. Pack hot mixture into hot jars, filling to ½ inch from top.  Remove air bubbles; wipe jar rims.  Cover at once with metal lids, and screw on bands.

4. Process in boiling-water bath 15 minutes.

Yield: 5 ½ pints

Linda

Southern Corn Bread with Tomato Jam

Here’s a “how to” on transforming basic buttermilk cornbread into something divine. Spread it with amazingly delicious Tomato Jam prepared by Sarah and Jackie or Honey-Thyme Butter with the thyme added straight from our garden.

image

Ingredients: 2 tablespoon vegetable shortening or bacon drippings 1 ½ cups Aunt JEMIMA Enriched White Corn Meal 3 tablespoons all-purpose flour 1 teaspoon salt 1 teaspoon baking soda 2 cups buttermilk 1 egg Directions: 1. Preheat oven to 450 degrees. 2. Place shortening or drippings in a 9-inch skillet with ovenproof handle or 8-inch square baking pan. 3. Place in oven about 3 minutes.  Skillet will be very hot when shortening is melted. 4. While skillet is heating, in large bowl combine corn meal, flour, salt and baking soda; add buttermilk and egg, mixing well. 5. Pour batter into hot prepared skillet. 6. Bake 22 to 25 minutes or until surface cracks and edges are light golden brown and pull away from side of pan. Yield: 8 servings Variation: Muffins – Pour corn bread batter into well-greased muffin cups.  Bake in preheated 425 degrees oven 15 to 18 minutes, light golden brown. Yield: 12 muffins Tomato Jam image Ingredients: 5 pounds tomatoes,finely chopped 3 ½ cups sugar 8 tablespoons lime juice 2 teaspoons freshly grated ginger 1 teaspoon cinnamon ½ teaspoon ground cloves 1 tablespoon salt 1 tablespoon red chili flakes Directions: 1. Combine all ingredients in a large, non-reactive pot.  Bring to a boil and then reduce temperature to a simmer.  Stirring regularly, simmer the jam until it reduces to a sticky, jammy mess.  This will take between 1 to 1 ½ hours, depending on how high you keep your heat. 2.  When the jam has cooked down sufficiently, remove from heat and fill jars, leaving ¼ inch of head space.  Wipe rims, apply lids and twist on rings.  Process in a boiling water canner for 20 minutes. 3.  When time is up, remove jars from water bath and allow them to cool.  When jars are cool enough to handle, test seals.  Store jars in a cool, dark place for up to one year. Yield: 3 – 5 pints, depending on tomatoes and how much you cook it down. Linda

Harvest Lunch Grilled Vegetables

image

Grilling these fresh vegetables couldn’t be easier!

Ingredients:

Fresh vegetables of your choice (zucchini, onions, tomatoes, yellow squash, red peppers, and green peppers)

Olive oil

1 (1 ounce) packet dry Italian dressing mix

Directions:

1.  Wash and dry all your vegetables.  Cut into large bite-size pieces.

2.  Take two pieces of heavy-duty aluminum foil that are each about 20” long.

Lay one on top of the other perpendicularly, so that they make an “X”.

3.  Fold up all the edges so that you create a little “bowl” shape.

4.  Place chopped vegetables in the aluminum foil bowl and spread them out.  Try to have just a single layer of vegetables, if possible; or make 2 or 3 “bowls” so that all the vegetables are evenly cooked.

5.  Drizzle the vegetables with olive oil (just a couple of tablespoons, depending on how many vegetables you use) and pour the powdered dressing mix on top of the vegetables.  Mix all together until the vegetables are evenly covered with oil and dressing mix.

6.  Place the foil bowl of vegetables on a grill on medium heat.  Grill for 10-15 minutes

(depending on how “crunchy” you like them to be), stirring occasionally to make sure they are all cooking evenly.

7.  Remove from grill when finished and enjoy!

Linda